Support

Osstell Beacon

Here you will find all the information you need about your instrument, including set-up, usage and care, as well as support material and answers to your questions.

Support materials

User manual

How to measure

How to register

How to connect to OsstellConnect

Warranty policy

Trouble shoot – no reading

STEP 1

Charge your Osstell Beacon

Charge your new instrument for 3 hours before use.

STEP 2

Register your Beacon on OsstellConnect and get rewarded

Register your Beacon on OsstellConnect and receive 2 free boxes of SmartPegs (valid for new instruments while stocks last).

STEP 3

Start measuring

Follow the step-by-step guides in the Help section of OsstellConnect, or contact us for support.

Set up your instrument – step by step

In this short video we will guide you, step-by-step, how to set up and register your Osstell Beacon. Get started in 5 minutes and get 2 boxes of SmartPegs for free.

Register here

Measure implant stability with Osstell Beacon

The Osstell Beacon determines implant stability in a matter of seconds. In this video, we show you how to measure. For more step-by-step guides, please visit the Help section in your OsstellConnect account.

Go to OsstellConnect
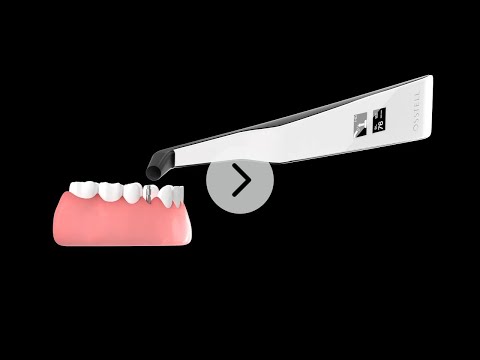
Register product

Barrier sleeve

Prior to use on a patient, place a barrier sleeve over the Osstell Beacon. The barrier sleeve helps prevent cross-contamination and helps keep dental composite material from adhering to the surface of the instrument tip and body, and discoloration and degradations from cleaning solutions.

Recommended barrier sleeves:

Omnia: Non sterile cover, Art No 30.Z0600.00, Sterile cover Art No 22.Z0600.00

PremiumPlus: 123, Small short 123, Small.

Click here to order it (UK)
Click here to order it (countries outside UK)


TIDIshield, Art no: 21021, Art no: 20987.

Click here to order it.

Barrier sleeve

The Osstell ISQ scale

ISQ, or Implant Stability Quotient, is a scale from 1 to 99 and is a measure of the stability of an implant. The ISQ scale has a non-linear correlation to micro mobility. With more than 1500 scientific references, we now know that high stability means >70 ISQ, between 60-69 is medium stability and < 60 ISQ is considered as low stability.

The ISQ scale

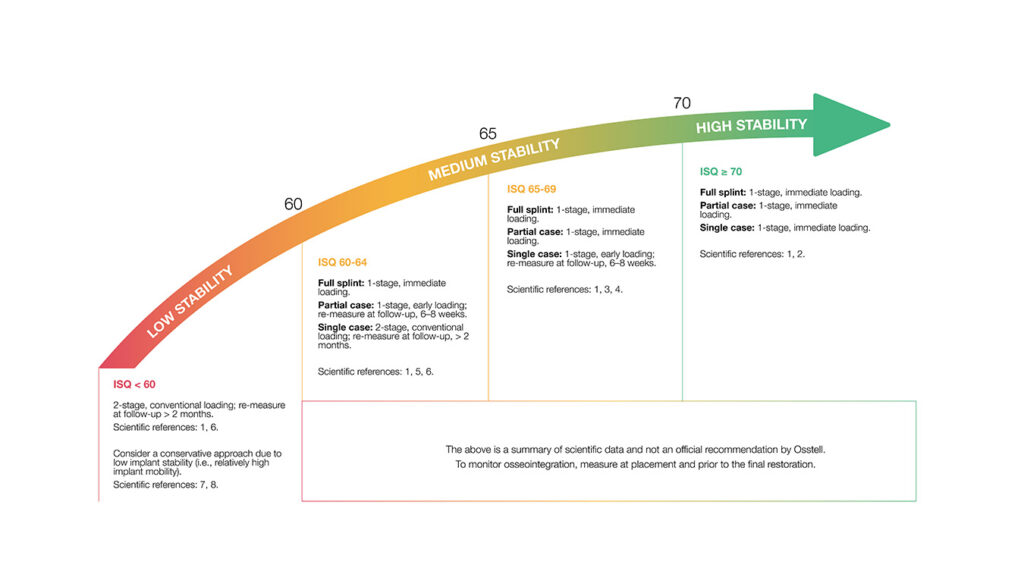
Frequently asked questions

Do I need to be connected to Wi‑Fi?

No, a Wi‑Fi connection is not required to use your Osstell Beacon. You can measure implant stability and document ISQ values manually in your patient journal or in OsstellConnect at a later stage.
If connected, the Osstell Beacon can communicate wirelessly with OsstellConnect, allowing measurements to be transferred and recorded automatically.
OsstellConnect is an online tool used for data collection, statistical analysis and clinical insights based on your measurements.
To use the data connection, your Osstell Beacon must first be registered. The serial number can be found on the back of the instrument. For registration guidance and more information, please visit https://osstellconnect.com/register

How do I switch the Osstell Beacon from transport mode to use mode?

The Osstell Beacon is delivered in transportation mode with the motion sensor deactivated. To switch modes, briefly connect the USB cable to the instrument and a USB port on a computer for a few seconds, then disconnect.

How do I get started?

Start by charging the instrument for about 3 hours to ensure optimal performance.

The Osstell Beacon starts automatically when moved, shows the battery status, and is then ready for measurement in the BL (buccal-lingual) direction.

Bring the instrument close to a SmartPeg or TestPeg to start measuring. An audible signal confirms the measurement, and the ISQ value is shown together with a coloured stability indication (red, yellow, green).

At start-up, an OsstellConnect code is displayed until the instrument is registered. You can register your instrument here: Register to OsstellConnect.

The instrument turns off automatically after 60 seconds without movement.

How do I measure with the Osstell Beacon?

Video on how to measure: Measure with Osstell Beacon

1. Activate the Osstell Beacon by picking it up. The instrument will start-up and after showing the battery status, the instrument will be ready for measurement in the BL (Buccal – Lingual) direction, which is prompted in the upper display as well as optimal angle towards the Smartpeg.

2. Place a barrier sleeve over the Osstell beacon instrument.

3. Place the SmartPeg into the SmartPeg Mount. The SmartPeg is magnetic, and the SmartPeg Mount will hold the SmartPeg. See fig 2. Attach the SmartPeg to the implant or abutment by screwing the SmartPeg Mount using finger force of approximately 4-6 Ncm. Do not over-tighten, to avoid damaging the SmartPeg threads.

4. Hold the instrument tip close (2-4mm) to the top of the SmartPeg without touching it. Sometimes, you will need to go as close as 1 mm. An audible sound indicates when measurement has started, and measured data will be shown in the upper display combined with a colored light indication below the tip.

5. Bring the instrument out of the mouth to clearly read the ISQ value and the colored indication. The measured ISQ values will be displayed in the upper display for a couple of seconds and then switch to be ready for measurement in mesial-distal direction.

6. Repeat step 4 and the sequence starts over and the Osstell Beacon is ready for measurement in the BL (Buccal- Lingual) direction again.

7. When all measurements are performed, remove the SmartPeg by using the SmartPeg Mount. The instrument is automatically turned off after 60 seconds of inactivity.

What should I do if the Osstell Beacon doesn’t start or when the display is showing a wrench and a manual?

Charge the Beacon for at least 30 min in room temperature, then try again. If the error remains, try resetting the device by:

1. Identify the Beacon reset pin on the picture below.

2. With a paper clip, do a gentle press for 1 second on the reset button (Note! You may have to tilt the pin a little downwards).
If you see a “PadLock” symbol in the upper display, press one more time on the reset button.


If the Beacon still doesn’t start or the display is showing a wrench and a manual, then please contact your local sales representative or distributor or support@osstell.com.

Why do I get unexpected values or no readings when taking measurements?

Several factors may cause unexpected ISQ values or failure to obtain a reading:

  1.  Incorrect use or condition of the SmartPeg
    Single-use SmartPeg: These are intended for one treatment session and one patient only. Reusing a single-use SmartPeg may lead to worn threads and unreliable measurements.
    Reusable SmartPeg: Ensure it has been correctly cleaned, inspected, and is not damaged. Wear, deformation or contamination can affect performance.
  2.  Wrong SmartPeg type selected
    Make sure you have selected the correct SmartPeg Type for the specific implant system and connection. Refer to the SmartPeg Reference Guide.
  3.  Tissue or debris in the implant connection
    Bone fragments, soft tissue or fluid between the implant interface and the SmartPeg can prevent proper seating. Clean the implant prosthetic connection thoroughly before attaching the SmartPeg.
  4. Electromagnetic interference
    Nearby sources of electromagnetic disturbance may disrupt the measurement. Remove or switch off the source where possible.
  5. Incorrect measuring instrument positioning
    Hold the instrument tip 2–4 mm from the SmartPeg and aim it correctly towards the top of the peg at an angle of approximately 45°. Do not touch the magnet.

Do you need help?

Fill in the form and we will be in touch shortly. Talk to you soon!