Support
FAQ
Hier finden Sie weitere Informationen über unsere Produkte, die ISQ-Skala und deren Verwendung, OsstellConnect, die Osstell-Technologie und vieles andere mehr.
Fragen zu OsstellConnect
You can record ISQ at abutment level in OsstellConnect, but it is important to follow the correct clinical measurement procedure to obtain accurate values.
How to measure ISQ at abutment level
- Perform an implant level measurement first, before placing the abutment.
- Measure again at abutment level during the same session, using a SmartPeg made for abutment level measuring.
- Determine the offset by noting the difference between implant level and abutment level ISQ. This offset remains stable throughout healing and should be used when interpreting follow-up measurements.
- For all subsequent visits, measure on the abutment and apply the same offset to understand the true implant ISQ.
How to record the measurement in OsstellConnect:
- Go to the patient’s register, select the patient and the implant in the tooth chart. Click ‘Add abutment’, choose the abutment, and save.
- Select ‘Measure stability’ and choose ‘Abutment’ under Measurement level. Measure on the abutment as you would at implant level and save.
- To review the stability trend, open the Stability tab and toggle ‘Show abutment’. You can also enable ‘Show details’ to view buccal–lingual and mesial–distal ISQ values.
For a more detailed explanation and clinical guidance, see our blog post here.
• To document an implant failure, go to your patients records. Select the patient, then select the tooth. Click ‘Mark as failed’. Choose the type of failure (early or late failure), fill in the failure date. Choose the reason for failure. Click ‘Mark as failed’.
• You can access the history of the implant failure by navigating to the history tab. Click the tab ‘Failed’ to see all information related to the treatment and the failure.
• A history symbol is displayed on the tooth with a failed implant.
Bei bestehender Internetverbindung werden die Daten aus Ihrem Osstell IDx automatisch in Ihr OsstellConnect-Konto hochgeladen. Befolgen Sie die hier aufgeführten Anweisungen, um eine Verbindung zwischen Ihrem Gerät und dem Internet herzustellen.
Sie können auch Backups, z. B. auf einem USB-Stick, erstellen. Befolgen Sie die hier aufgeführten Anweisungen.
Überprüfen Sie, bevor Sie beginnen, ob das Beacon-Gateway bereits installiert ist. Wenn nicht, wechseln Sie in Ihrem Konto zu Ihrer Klinik, klicken Sie auf die Registerkarte mit den Instrumenten und laden Sie das Gateway herunter. Installieren Sie es.
- Verbinden Sie den Osstell Key mit einem USB-Anschluss an Ihrem Computer.
- Nehmen Sie das Instrument in die Hand. Anhand der folgenden Symbolanimation erkennen Sie, dass es eine Verbindung mit OsstellConnect herstellt. Der Vorgang kann einige Sekunden dauern.
- Sobald die Verbindung hergestellt ist, stoppt die Symbolanimation.
- Rufen Sie die Patientenakten auf.
- Legen Sie den Patienten an, wenn zum ersten Mal eine Messung durchgeführt wird. Geben Sie die Patientendaten ein und speichern Sie sie. Klicken Sie auf „Neue Behandlung“ und geben Sie die Informationen zur Behandlung ein. Klicken Sie auf „Implantat hinzufügen“, geben Sie die Daten zum Implantat ein und speichern Sie sie. Klicken Sie auf „Stabilität messen“.
- Wenn es sich um eine Folgemessung handelt, wählen Sie den Patienten und dann in der Zahnkarte den Zahn aus. Klicken Sie auf „Stabilität messen“.
- Nehmen Sie die Messung in bukkal-lingualer Richtung vor. Der ISQ-Wert wird in OsstellConnect angezeigt.
- Nehmen Sie die Messung in mesial-distaler Richtung vor. Der ISQ-Wert wird in OsstellConnect angezeigt.
- Geben Sie die Informationen zur Behandlung ein und speichern Sie sie.
Yes, simply navigate to your patient records. Select the patient. Select the implant. Go to the stability tab. Click on the edit icon by the measurement you would like to delete. Click delete. Please note that the measurement will be permanently removed from the patient chart.
Yes, simply navigate to your patient records. Select the patient you would like to delete. Click delete in the upper right corner. Confirm that you want to delete the patient and all data. Please note that it will be permanently removed from your account.
Ja, alle Daten können zur weiteren Analyse in eine Excel-Datei exportiert werden. Wechseln Sie dazu einfach zu den Patientenakten und klicken Sie auf die Option für den Export nach CSV. Sie finden die Datei im Ordner „Downloads“.
Stellen Sie sicher, dass alle exportierten Daten unter Einhaltung der geltenden Datenschutzbestimmungen, etwa DSGVO oder HIPAA, verarbeitet werden.
Yes, simply navigate to your patient records. Select the patient. Select the implant you want to edit on the tooth chart. Select the tab ‘Implant & abutment’. Click on the pen icon to edit. Edit implant data. Save.
Simply navigate to your patient records. Select the patient. Click ‘edit’ on the top right corner. Edit the data and save.
You can find the serial number on the back of your instrument.
Osstell Beacon
• To find your registration code, please make sure that you have already installed the Beacon Gateway. If you have not installed it yet, please navigate to your clinic in your account, click the instruments tab and download the gateway. Install it.
• Take your instrument in hand. It is now connecting to OsstellConnect and you should see a symbol animating. Please note that it can take a few seconds.
• When connected, the symbol stops animating.
• The registration code is now displayed on the lower screen of your instrument.
Osstell IDx
• When turning on your Osstell IDx for the first time, you will be prompted to select language, time zone, date and time.
• After that, you will need to set up a 4-digit pin code and a backup password. The backup password is needed when restoring to a backup, so please note it down and save it in a safe place.
• Your registration code is now displayed on your Osstell IDx.
Questions about Smartpegs
Yes, it can be sterilised with a Prion cycle at 134 °C for 18 minutes.
Whether you are using a single-use or a reusable SmartPeg, it should always be installed using the SmartPeg Mount and tightened to approximately 4–6 Ncm – typically described as finger tight. This ensures proper seating and accurate ISQ measurements without risking damage to the implant or the SmartPeg.
Yes. You can mix single-use and reusable SmartPegs during the same treatment session. The only requirement is that you use the correct SmartPeg Type number for the specific implant or abutment you are measuring.
Whether the SmartPeg is single-use or reusable does not affect the measurement.
Yes, as long as its integrity and performance are maintained.
Osstell is also the only company offering both a sterile single-use and a reusable SmartPeg made of aluminium, supported by more than 1,500 published studies on the ISQ method.
With the Osstell original ISQ scale and SmartPegs, no conversion tables or correction factors are needed. The measured ISQ value is the true value, regardless of whether you use a single use or a reusable SmartPeg.
SmartPegs are supplied in different packaging formats depending on whether they are single-use or reusable:
Single-use SmartPegs
- Delivered sterile.
- Supplied in boxes of 5 pieces, in a single sterile barrier system with protective outer packaging.
- Intended for one treatment session only and must not be reused.
Reusable SmartPegs
- Delivered nonsterile in individual packaging.
- Must be cleaned, disinfected and sterilized before the first clinical use and after every subsequent use. (See quickguide at osstell/ifu).
SmartPeg Mount
- Delivered nonsterile with the instrument.
- Can be purchased separately, in package of 5.
- Must also be cleaned, disinfected and sterilized before use and between patients. (See quickguide at osstell/ifu).
Yes. The reusable and single use SmartPegs are designed so they can be easily distinguished visually:
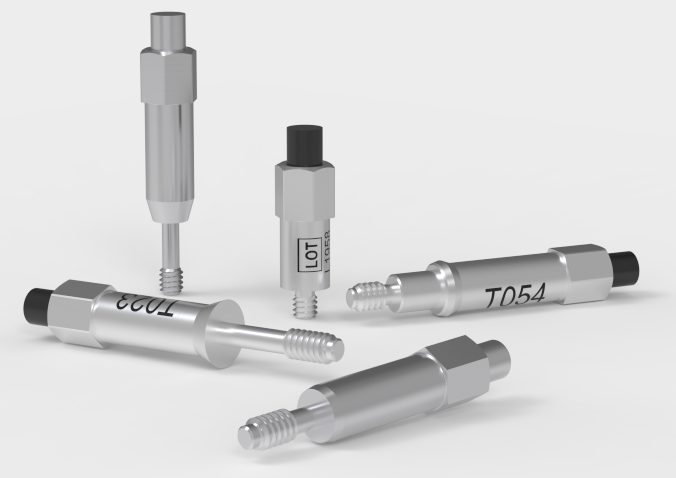
- The single-use SmartPeg is supplied sterile, has an aluminium coloured (non coloured) magnet, and does not include any laser marked identifiers on the body.
- The reusable SmartPeg has a black magnet on top and carries laser marked Type and LOT numbers on the body for identification and traceability.

The reusable SmartPeg can be used for up to 20 reprocessing cycles, as long as its integrity and performance are maintained.
If inspection reveals wear, deformation, corrosion, damaged threads, or any loss of functional compatibility, the SmartPeg must be discarded, even if it has been processed fewer than 20 times.
The single-use SmartPeg is intended for one treatment session only and must not be reprocessed.
The reusable SmartPeg is engineered with special protective surface coating – one on the SmartPeg body and another black protective coating on the magnet. These coatings provide resistance to moisture, cleaning chemicals, wear, and corrosion, ensuring that the SmartPeg maintains its performance throughout the validated number of reprocessing cycles.
The reusable SmartPeg can easily be distinguished from the single use version: it has a black magnet, and its LOT and Type number are laser marked on the body for clear identification.
Prior to the first clinical use, and after each use the reusable products must be cleaned, disinfected and sterilized according to the instructions in the quickguide that is found here: Osstell/ifu
You can record ISQ at abutment level in OsstellConnect, but it is important to follow the correct clinical measurement procedure to obtain accurate values.
How to measure ISQ at abutment level
- Perform an implant level measurement first, before placing the abutment.
- Measure again at abutment level during the same session, using a SmartPeg made for abutment level measuring.
- Determine the offset by noting the difference between implant level and abutment level ISQ. This offset remains stable throughout healing and should be used when interpreting follow-up measurements.
- For all subsequent visits, measure on the abutment and apply the same offset to understand the true implant ISQ.
How to record the measurement in OsstellConnect:
- Go to the patient’s register, select the patient and the implant in the tooth chart. Click ‘Add abutment’, choose the abutment, and save.
- Select ‘Measure stability’ and choose ‘Abutment’ under Measurement level. Measure on the abutment as you would at implant level and save.
- To review the stability trend, open the Stability tab and toggle ‘Show abutment’. You can also enable ‘Show details’ to view buccal–lingual and mesial–distal ISQ values.
For a more detailed explanation and clinical guidance, see our blog post here.
ISQ should always be measured in two directions, because implant stability can vary depending on the amount of surrounding bone in different directions. Measuring from two angles ensures that both the most and the least stable directions are captured.
To do this, take one measurement in the buccal-lingual direction and one in the mesial-distal direction. These two ISQ values represent the different stability directions. Sometimes the values are identical; sometimes they differ.
If the two measurements differ, always rely on the lowest ISQ value, as it reflects the weakest direction and therefore provides the most clinically relevant information about implant stability.
No. A torque device should not be used to tighten the SmartPeg.
SmartPegs should always be mounted using the SmartPeg Mount and tightened to approximately 4–6 Ncm, which is typically described as finger tight.
This ensures the SmartPeg is seated correctly without risking damage to the implant connection.
Osstell measures implant stability using Resonance Frequency Analysis (RFA). The small SmartPeg that you attach to the implant has a tiny magnet on top. When the probe sends magnetic pulses, the SmartPeg starts to vibrate – similar to a very small tuning fork.
How it works:
- The instrument tip sends magnetic pulses
These pulses make the SmartPeg vibrate without touching it. - The vibration changes depending on how stable the implant is
– A stable implant (good bone support) makes the SmartPeg vibrate faster.
– A less stable implant makes it vibrate slower. - The device converts this vibration into an ISQ value
– Higher stability → higher frequency → higher ISQ
– Lower stability → lower frequency → lower ISQ
It takes less than a second, and the ISQ value is shown immediately.
Yes. The ISQ value can be affected if the SmartPeg is not mounted correctly.
For accurate measurements, the SmartPeg should be attached finger tight using the SmartPeg Mount, which corresponds to about 4–6 Ncm.
At this level, the SmartPeg has firm, stable contact with the implant, and the resulting ISQ value is consistent – typically within ±2 ISQ units.
- If the SmartPeg is not fully seated:
The contact becomes unstable, and the ISQ value can appear artificially low, or you don’t receive any value. - If too much force is applied:
Overtightening does not improve accuracy. It may damage the SmartPeg threads.
– A reusable SmartPeg may be damaged so it cannot be used again.
– A single use or reusable SmartPeg may have its threads deformed, which can lead to inaccurate measurements during that session or, in worst case a broken SmartPeg.
In short: finger tight (4–5 Ncm) is enough to ensure stable contact and reliable ISQ readings.
The following products may be autoclaved (over-pressurized steam up to 135 deg Celsius):
- SmartPeg Mount
- Reusable SmartPeg
- Probe (IDx)
Please note that single-use SmartPegs are disposable and cannot be autoclaved!
Different implants require specific SmartPegs to ensure accurate measurement. Each SmartPeg is matched to a particular implant system and connection type.
You can find the correct SmartPeg for your implant in the SmartPeg Reference Guide – click here to access it.
Fragen zum Osstell Beacon
Osstell Beacon – 2 Jahre
W&H Osstell Classic – 1 Jahr
Befeuchten Sie vor jedem Gebrauch Mull oder ein weiches Tuch mit einem der empfohlenen Oberflächenreiniger (siehe folgende Liste) und wischen Sie das gesamte Instrument damit ab.
Empfohlene Reinigungsmittel:
- Isopropylalkohol, 70 %
- Schwach schäumende, pH-neutrale, enzymatische Reinigungsmittel wie:
- BePro Disinfectant Wipes, REF 19500102, www.wh.com (können bei W&H Sterilization bestellt werden)
- Medizime LF
- Enzol
Folgende Reinigungsmittel dürfen nicht verwendet werden:
- Reinigungs- oder Desinfektionsmittel auf Phenol-/Säurebasis
- Stark alkalische Reinigungsmittel aller Art einschließlich Handseifen und Geschirrspülmittel
- Reinigungsmittel auf Bleichmittelbasis
- Reinigungsmittel auf Wasserstoffperoxidbasis
- Scheuermittel
- Reinigungsmittel auf Aceton- oder Kohlenwasserstoffbasis
- MEK (Methylethylketon)
- Birex
- Glutaraldehyd
- Reinigungsmittel auf der Basis von quartärem Ammoniumchloridsalz
Das Instrument erfordert keine regelmäßige Wartung. Bei einer Fehlfunktion des Instruments kontaktieren Sie für weitere Informationen den Vertrieb oder den Händler vor Ort.
You can record ISQ at abutment level in OsstellConnect, but it is important to follow the correct clinical measurement procedure to obtain accurate values.
How to measure ISQ at abutment level
- Perform an implant level measurement first, before placing the abutment.
- Measure again at abutment level during the same session, using a SmartPeg made for abutment level measuring.
- Determine the offset by noting the difference between implant level and abutment level ISQ. This offset remains stable throughout healing and should be used when interpreting follow-up measurements.
- For all subsequent visits, measure on the abutment and apply the same offset to understand the true implant ISQ.
How to record the measurement in OsstellConnect:
- Go to the patient’s register, select the patient and the implant in the tooth chart. Click ‘Add abutment’, choose the abutment, and save.
- Select ‘Measure stability’ and choose ‘Abutment’ under Measurement level. Measure on the abutment as you would at implant level and save.
- To review the stability trend, open the Stability tab and toggle ‘Show abutment’. You can also enable ‘Show details’ to view buccal–lingual and mesial–distal ISQ values.
For a more detailed explanation and clinical guidance, see our blog post here.
You can find the serial number on the back of your instrument.
Osstell Beacon
• To find your registration code, please make sure that you have already installed the Beacon Gateway. If you have not installed it yet, please navigate to your clinic in your account, click the instruments tab and download the gateway. Install it.
• Take your instrument in hand. It is now connecting to OsstellConnect and you should see a symbol animating. Please note that it can take a few seconds.
• When connected, the symbol stops animating.
• The registration code is now displayed on the lower screen of your instrument.
Osstell IDx
• When turning on your Osstell IDx for the first time, you will be prompted to select language, time zone, date and time.
• After that, you will need to set up a 4-digit pin code and a backup password. The backup password is needed when restoring to a backup, so please note it down and save it in a safe place.
• Your registration code is now displayed on your Osstell IDx.
Laden Sie zunächst das Instrument etwa 3 Stunden auf, um eine optimale Leistung zu gewährleisten.
Das Osstell Beacon startet automatisch, sobald es in die Hand genommen wird, zeigt den Batteriestatus an und ist dann einsatzbereit für Messungen in bukkal-lingualer Richtung (BL).
Bringen Sie das Instrument nahe an ein SmartPeg oder TestPeg, um mit der Messung zu beginnen. Ein Signalton bestätigt die Messung und der ISQ-Wert wird zusammen mit einer Stabilitätsindikation (rot, gelb, grün) angezeigt.
Bis das Instrument registriert ist, wird beim Start ein OsstellConnect-Code angezeigt. Sie können Ihr Instrument hier registrieren: Bei OsstellConnect registrieren.
Wird das Instrument 60 Sekunden lang nicht bewegt, schaltet es sich automatisch aus.
Video on how to measure: Measure with Osstell Beacon
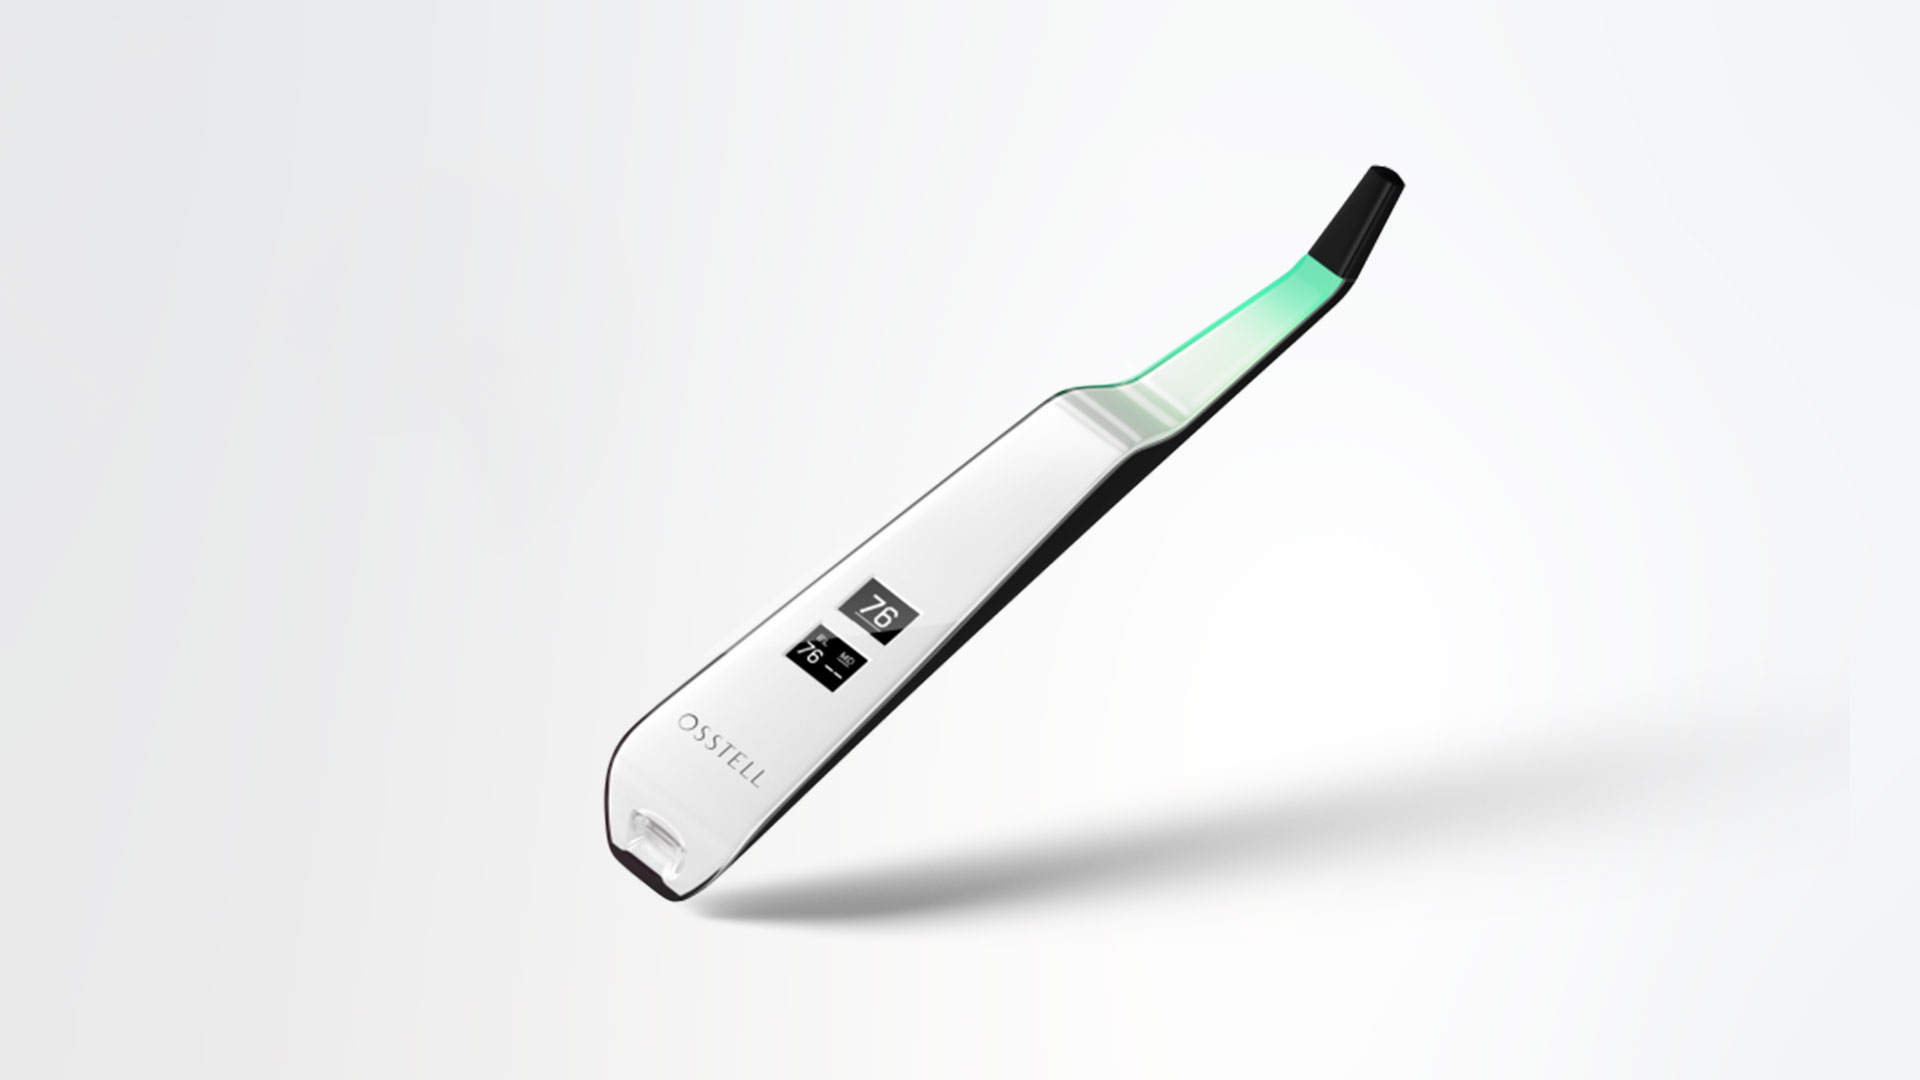
1. Activate the Osstell Beacon by picking it up. The instrument will start-up and after showing the battery status, the instrument will be ready for measurement in the BL (Buccal – Lingual) direction, which is prompted in the upper display as well as optimal angle towards the Smartpeg.
2. Place a barrier sleeve over the Osstell beacon instrument.
3. Place the SmartPeg into the SmartPeg Mount. The SmartPeg is magnetic, and the SmartPeg Mount will hold the SmartPeg. See fig 2. Attach the SmartPeg to the implant or abutment by screwing the SmartPeg Mount using finger force of approximately 4-6 Ncm. Do not over-tighten, to avoid damaging the SmartPeg threads.
4. Hold the instrument tip close (2-4mm) to the top of the SmartPeg without touching it. Sometimes, you will need to go as close as 1 mm. An audible sound indicates when measurement has started, and measured data will be shown in the upper display combined with a colored light indication below the tip.
5. Bring the instrument out of the mouth to clearly read the ISQ value and the colored indication. The measured ISQ values will be displayed in the upper display for a couple of seconds and then switch to be ready for measurement in mesial-distal direction.
6. Repeat step 4 and the sequence starts over and the Osstell Beacon is ready for measurement in the BL (Buccal- Lingual) direction again.
7. When all measurements are performed, remove the SmartPeg by using the SmartPeg Mount. The instrument is automatically turned off after 60 seconds of inactivity.
Mögliche Gründe:
Wiederverwendeter SmartPeg: SmartPegs sind Einwegprodukte und dürfen nur für eine oder mehrere Messungen im Rahmen einer einzigen Behandlungssitzung und nur für einen einzigen Patienten verwendet werden. Wiederholter Gebrauch kann aufgrund von Verschleiß am weichen SmartPeg-Aluminiumgewinde zu falschen Messwerten führen.
Wahl des falschen SmartPeg-Typs für das Implantat: Siehe SmartPeg-Referenzliste unter osstell.com/smartpegguide
Knochen oder Weichgewebe zwischen SmartPeg und Implantat: Achten Sie darauf, die Verbindung zwischen Implantat und Prothese vor dem Anbringen des SmartPegs zu reinigen.
Elektromagnetische Störungen: Entfernen Sie die Quelle elektromagnetischer Störungen.
Zu großer Abstand zwischen Sonde und SmartPeg: Halten Sie die Sonde in einem Abstand von 2 bis 4 mm zum SmartPeg.
Video zum Durchführen von Messungen: Messen mit dem Osstell Beacon
- Das Osstell Beacon zur Hand nehmen. Dadurch schaltet sich das Instrument ein. Es startet, zeigt den Batteriestatus an und ist dann einsatzbereit für Messungen in bukkal-lingualer Richtung (BL). Im oberen Display werden eine entsprechende Aufforderung sowie der optimale Winkel zum SmartPeg angezeigt.
- Eine Hygieneschutzhülle am Osstell Beacon anbringen.
- Das SmartPeg in den SmartPeg Mount einsetzen. Das SmartPeg ist magnetisch und hält in dem SmartPeg Mount. Siehe Abb. 2. Das SmartPeg manuell mit dem SmartPeg Mount auf das Implantat oder Abutment schrauben (mit etwa 4–6 Ncm). Nicht zu stark festschrauben, um das SmartPeg-Gewinde nicht zu beschädigen.
- Die Spitze des Instruments bis auf 2–4 mm an die Spitze des SmartPeg heranführen, ohne dieses zu berühren. Mitunter muss sie bis 1 mm herangeführt werden. Wenn die Messung beginnt, ist ein Signal zu hören. Die Messdaten werden im oberen Display angezeigt. Gleichzeitig ist unterhalb der Spitze eine farbige Leuchtanzeige zu sehen.
- Den ISQ-Wert und die farbige Leuchtanzeige ablesen. Das Instrument dazu aus dem Mund des Patienten nehmen. Die gemessenen ISQ-Werte werden einige Sekunden lang im oberen Display angezeigt. Dann schaltet das Instrument um für die Messung in mesial-distaler Richtung.
- Wieder wie unter Schritt 4 erläutert vorgehen. Die Messsequenz beginnt von vorn und das Osstell Beacon ist bereit für die nächste Messung in bukkal-lingualer Richtung (BL).
- Sind alle Messungen abgeschlossen, das SmartPeg mithilfe des SmartPeg Mount entfernen. Wird das Instrument 60 Sekunden lang nicht verwendet, schaltet es sich automatisch aus.
No, a Wi‑Fi connection is not required to use your Osstell Beacon. You can measure implant stability and document ISQ values manually in your patient journal or in OsstellConnect at a later stage.
If connected, the Osstell Beacon can communicate wirelessly with OsstellConnect, allowing measurements to be transferred and recorded automatically.
OsstellConnect is an online tool used for data collection, statistical analysis and clinical insights based on your measurements.
To use the data connection, your Osstell Beacon must first be registered. The serial number can be found on the back of the instrument. For registration guidance and more information, please visit https://osstellconnect.com/register
The Osstell Beacon is delivered in transportation mode with the motion sensor deactivated. To switch modes, briefly connect the USB cable to the instrument and a USB port on a computer for a few seconds, then disconnect.
Charge the Beacon for at least 30 min in room temperature, then try again. If the error remains, try resetting the device by:
1. Identify the Beacon reset pin on the picture below.

![]()
2. With a paper clip, do a gentle press for 1 second on the reset button (Note! You may have to tilt the pin a little downwards).
If you see a “PadLock” symbol in the upper display, press one more time on the reset button.
If the Beacon still doesn’t start or the display is showing a wrench and a manual, then please contact your local sales representative or distributor or support@osstell.com.
ISQ should always be measured in two directions, because implant stability can vary depending on the amount of surrounding bone in different directions. Measuring from two angles ensures that both the most and the least stable directions are captured.
To do this, take one measurement in the buccal-lingual direction and one in the mesial-distal direction. These two ISQ values represent the different stability directions. Sometimes the values are identical; sometimes they differ.
If the two measurements differ, always rely on the lowest ISQ value, as it reflects the weakest direction and therefore provides the most clinically relevant information about implant stability.
Derzeit gibt es Tausende Artikel über Studien, in denen Geräte von Osstell eingesetzt wurden und die in wissenschaftlichen Publikationen veröffentlicht wurden. Diese Abstrakte können in unserer durchsuchbaren Datenbank unter „Ressourcen/Wissenschaftliche Datenbank“ abgerufen werden.
Die Osstell ISQ-Skala basiert auf den Ergebnissen dieser Studien, die alle unter Verwendung der Instrumente und der aus Aluminium bestehenden SmartPegs von Osstell durchgeführt wurden.
Osstell measures implant stability using Resonance Frequency Analysis (RFA). The small SmartPeg that you attach to the implant has a tiny magnet on top. When the probe sends magnetic pulses, the SmartPeg starts to vibrate – similar to a very small tuning fork.
How it works:
- The instrument tip sends magnetic pulses
These pulses make the SmartPeg vibrate without touching it. - The vibration changes depending on how stable the implant is
– A stable implant (good bone support) makes the SmartPeg vibrate faster.
– A less stable implant makes it vibrate slower. - The device converts this vibration into an ISQ value
– Higher stability → higher frequency → higher ISQ
– Lower stability → lower frequency → lower ISQ
It takes less than a second, and the ISQ value is shown immediately.
Wenn kein ISQ-Wert angezeigt wird, bedeutet dies in der Regel, dass die Vibration des SmartPeg vom Instrument nicht eindeutig festgestellt werden kann. Dafür gibt es mehrere mögliche Ursachen, von denen die meisten leicht zu beheben sind:
- Die Entfernung zum Instrument ist zu groß
Das Instrument sollte in einem Abstand von 2–4 mm zum oben am SmartPeg angebrachten Magneten gehalten werden. Der Magnet darf nicht berührt werden. Wenn kein Wert angezeigt wird, verringern Sie den Abstand, bis ein Signal erkannt wird. - Der Winkel muss angepasst werden
Das Magnetfeld ist gerichtet, daher ist die Ausrichtung des Instruments von Bedeutung. Messungen sollten in einem Winkel von etwa 45 Grad zum oberen Bereich des SmartPeg vorgenommen werden. - Sicherstellen, dass für das jeweilige Implantat der korrekte SmartPeg-Typ verwendet wird
Unter dem folgenden Link kann der korrekte SmartPeg-Typ ermittelt werden: Find my SmartPeg - Dämpfung durch Weichgewebe
Das umgebende Gewebe kann die Vibration manchmal stärker dämpfen als erwartet. Dies lässt sich in der Regel dadurch ausgleichen, dass der Abstand zwischen Instrument und SmartPeg verringert wird. - Die Implantatplattform ist nicht sauber
Stellen Sie sicher, dass die Implantatplattform sauber und frei von Debris ist, damit das SmartPeg korrekt sitzt und seine Vibration übertragen werden kann. - Das SmartPeg ist abgenutzt oder beschädigt
- Wenn Sie ein wiederverwendbares SmartPeg verwenden, vergewissern Sie sich, dass es vor dem Gebrauch geprüft wurde und nicht häufiger als 20 Mal wiederaufbereitet wurde. Ein wiederverwendbares SmartPeg, das abgenutzt oder verbogen oder dessen Gewinde beschädigt ist, vibriert nicht richtig, sodass das Instrument ggf. keinen Messwert anzeigt.
- Ein Einweg-SmartPeg ist nur für eine Behandlungssitzung bestimmt.
- Stellen Sie sicher, dass das SmartPeg fest auf dem Implantat sitzt und nicht in Kontakt mit dem umgebenden Gewebe kommt, da dies eine genaue Signalerfassung verhindern und dazu führen kann, dass kein oder ein falscher ISQ-Wert erfasst wird.
- Elektromagnetische Störungen
Starke in der Nähe befindliche elektromagnetische Störquellen können die Messung beeinträchtigen. (Einzelheiten siehe die häufig gestellten Fragen und Antworten zu elektromagnetischen Störungen.)
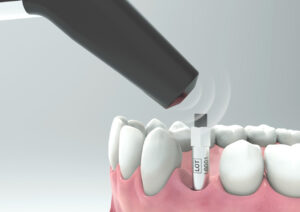
Nein. Das Messgerät von Osstell beeinträchtigt das Implantat nicht. Das Instrument bringt nur das SmartPeg zum Vibrieren. Der Magnet des SmartPeg wird durch vom Gerät erzeugte Magnetimpulse mit sehr geringer Energie aktiviert. Die Methode ist objektiv, schonend und in hohem Maße reproduzierbar.
Ja, an Patienten mit Herzschrittmacher können ISQ-Messungen durchgeführt werden.
Als Vorsichtsmaßnahme sollte die Sonde aufgrund der während der Messung abgegebenen Magnetimpulse vom Brustbereich, in dem sich der Herzschrittmacher befindet, ferngehalten werden.
Es liegen veröffentlichte Berichte zum Thema Herzschrittmacher und Magnetfelder vor, die als weitere Informationsquelle dienen können.
Die Implantatstabilität kann in verschiedenen Behandlungsphasen gemessen werden.
Sie wird in der Regel bei der Implantatinsertion gemessen, um einen Ausgangswert zu ermitteln, und anschließend während der Einheilphase, um Veränderungen hinsichtlich der Stabilität und der Osseointegration zu überwachen. Oft wird vor der Belastung eine abschließende Messung durchgeführt, um die Entscheidung zu untermauern.
Wiederholte Messungen im zeitlichen Verlauf liefern wertvolle Informationen, da die Entwicklung der ISQ-Werte als Orientierungshilfe für klinische Entscheidungen dient.
Fragen zum Osstell Classic
Osstell Beacon – 2 Jahre
W&H Osstell Classic – 1 Jahr
Legen Sie vor der Anwendung am Patienten eine Hygieneschutzhülle über das Instrument. Die Hygieneschutzhülle hilft, einer Kreuzkontamination vorzubeugen, und verhindert, dass zahnmedizinisches Kompositmaterial an der Oberfläche von Instrumentenspitze und -korpus haftet. Darüber hinaus schützt sie das Instrument vor Verfärbungen und Schäden durch Reinigungslösungen.
Hinweis
- Hygieneschutzhüllen sind für den Einmalgebrauch vorgesehen.
- Entsorgen Sie gebrauchte Hygieneschutzhüllen nach dem Einsatz am Patienten im Restmüll.
- Lassen Sie die Hygieneschutzhülle nicht für längere Zeit am Instrument.
- Empfohlene Hygieneschutzhüllen finden Sie nachfolgend.
- TIDIShield, Art.-Nr.: 20808, Art.-Nr.: 20987. tidiproducts.com
- PremiumPlus: 183-2 Röntgensensorhülle, Größe 2
- Das Instrument ist nach jeder Patientenanwendung mit geeigneten Reinigungs- und/oder Desinfektionsmitteln zu reinigen und zu desinfizieren.
- Eine erste Messung sollte bei der Implantatinsertion vorgenommen werden, um einen Vergleichswert für Folgemessungen während der Einheilung zu erhalten. Vor der finalen Restauration folgt eine weitere Messung, um zu überprüfen, wie sich die Implantatstabilität entwickelt.
- Zur Ermittlung der geringsten Stabilität empfiehlt es sich, sowohl in bukkal-lingualer als auch in mesial-distaler Richtung zu messen. Das Instrument fordert den Benutzer daher auf, Messungen in beide Richtungen vorzunehmen.
- Klicken Sie hier für einen Film zum Vorgehen bei einer Messung.
Befeuchten Sie vor jedem Gebrauch Mull oder ein weiches Tuch mit einem der empfohlenen Oberflächenreiniger (siehe folgende Liste) und wischen Sie das gesamte Instrument damit ab.
Empfohlene Reinigungsmittel:
- Isopropylalkohol, 70 %
- Schwach schäumende, pH-neutrale, enzymatische Reinigungsmittel wie:
- BePro Disinfectant Wipes, REF 19500102, www.wh.com (können bei W&H Sterilization bestellt werden)
- Medizime LF
- Enzol
Folgende Reinigungsmittel dürfen nicht verwendet werden:
- Reinigungs- oder Desinfektionsmittel auf Phenol-/Säurebasis
- Stark alkalische Reinigungsmittel aller Art einschließlich Handseifen und Geschirrspülmittel
- Reinigungsmittel auf Bleichmittelbasis
- Reinigungsmittel auf Wasserstoffperoxidbasis
- Scheuermittel
- Reinigungsmittel auf Aceton- oder Kohlenwasserstoffbasis
- MEK (Methylethylketon)
- Birex
- Glutaraldehyd
- Reinigungsmittel auf der Basis von quartärem Ammoniumchloridsalz
Das Instrument erfordert keine regelmäßige Wartung. Bei einer Fehlfunktion des Instruments kontaktieren Sie für weitere Informationen den Vertrieb oder den Händler vor Ort.
You can record ISQ at abutment level in OsstellConnect, but it is important to follow the correct clinical measurement procedure to obtain accurate values.
How to measure ISQ at abutment level
- Perform an implant level measurement first, before placing the abutment.
- Measure again at abutment level during the same session, using a SmartPeg made for abutment level measuring.
- Determine the offset by noting the difference between implant level and abutment level ISQ. This offset remains stable throughout healing and should be used when interpreting follow-up measurements.
- For all subsequent visits, measure on the abutment and apply the same offset to understand the true implant ISQ.
How to record the measurement in OsstellConnect:
- Go to the patient’s register, select the patient and the implant in the tooth chart. Click ‘Add abutment’, choose the abutment, and save.
- Select ‘Measure stability’ and choose ‘Abutment’ under Measurement level. Measure on the abutment as you would at implant level and save.
- To review the stability trend, open the Stability tab and toggle ‘Show abutment’. You can also enable ‘Show details’ to view buccal–lingual and mesial–distal ISQ values.
For a more detailed explanation and clinical guidance, see our blog post here.
You can find the serial number on the back of your instrument.
Mögliche Gründe:
Wiederverwendeter SmartPeg: SmartPegs sind Einwegprodukte und dürfen nur für eine oder mehrere Messungen im Rahmen einer einzigen Behandlungssitzung und nur für einen einzigen Patienten verwendet werden. Wiederholter Gebrauch kann aufgrund von Verschleiß am weichen SmartPeg-Aluminiumgewinde zu falschen Messwerten führen.
Wahl des falschen SmartPeg-Typs für das Implantat: Siehe SmartPeg-Referenzliste unter osstell.com/smartpegguide
Knochen oder Weichgewebe zwischen SmartPeg und Implantat: Achten Sie darauf, die Verbindung zwischen Implantat und Prothese vor dem Anbringen des SmartPegs zu reinigen.
Elektromagnetische Störungen: Entfernen Sie die Quelle elektromagnetischer Störungen.
Zu großer Abstand zwischen Sonde und SmartPeg: Halten Sie die Sonde in einem Abstand von 2 bis 4 mm zum SmartPeg.
ISQ should always be measured in two directions, because implant stability can vary depending on the amount of surrounding bone in different directions. Measuring from two angles ensures that both the most and the least stable directions are captured.
To do this, take one measurement in the buccal-lingual direction and one in the mesial-distal direction. These two ISQ values represent the different stability directions. Sometimes the values are identical; sometimes they differ.
If the two measurements differ, always rely on the lowest ISQ value, as it reflects the weakest direction and therefore provides the most clinically relevant information about implant stability.
Derzeit gibt es Tausende Artikel über Studien, in denen Geräte von Osstell eingesetzt wurden und die in wissenschaftlichen Publikationen veröffentlicht wurden. Diese Abstrakte können in unserer durchsuchbaren Datenbank unter „Ressourcen/Wissenschaftliche Datenbank“ abgerufen werden.
Die Osstell ISQ-Skala basiert auf den Ergebnissen dieser Studien, die alle unter Verwendung der Instrumente und der aus Aluminium bestehenden SmartPegs von Osstell durchgeführt wurden.
Osstell measures implant stability using Resonance Frequency Analysis (RFA). The small SmartPeg that you attach to the implant has a tiny magnet on top. When the probe sends magnetic pulses, the SmartPeg starts to vibrate – similar to a very small tuning fork.
How it works:
- The instrument tip sends magnetic pulses
These pulses make the SmartPeg vibrate without touching it. - The vibration changes depending on how stable the implant is
– A stable implant (good bone support) makes the SmartPeg vibrate faster.
– A less stable implant makes it vibrate slower. - The device converts this vibration into an ISQ value
– Higher stability → higher frequency → higher ISQ
– Lower stability → lower frequency → lower ISQ
It takes less than a second, and the ISQ value is shown immediately.
Wenn kein ISQ-Wert angezeigt wird, bedeutet dies in der Regel, dass die Vibration des SmartPeg vom Instrument nicht eindeutig festgestellt werden kann. Dafür gibt es mehrere mögliche Ursachen, von denen die meisten leicht zu beheben sind:
- Die Entfernung zum Instrument ist zu groß
Das Instrument sollte in einem Abstand von 2–4 mm zum oben am SmartPeg angebrachten Magneten gehalten werden. Der Magnet darf nicht berührt werden. Wenn kein Wert angezeigt wird, verringern Sie den Abstand, bis ein Signal erkannt wird. - Der Winkel muss angepasst werden
Das Magnetfeld ist gerichtet, daher ist die Ausrichtung des Instruments von Bedeutung. Messungen sollten in einem Winkel von etwa 45 Grad zum oberen Bereich des SmartPeg vorgenommen werden. - Sicherstellen, dass für das jeweilige Implantat der korrekte SmartPeg-Typ verwendet wird
Unter dem folgenden Link kann der korrekte SmartPeg-Typ ermittelt werden: Find my SmartPeg - Dämpfung durch Weichgewebe
Das umgebende Gewebe kann die Vibration manchmal stärker dämpfen als erwartet. Dies lässt sich in der Regel dadurch ausgleichen, dass der Abstand zwischen Instrument und SmartPeg verringert wird. - Die Implantatplattform ist nicht sauber
Stellen Sie sicher, dass die Implantatplattform sauber und frei von Debris ist, damit das SmartPeg korrekt sitzt und seine Vibration übertragen werden kann. - Das SmartPeg ist abgenutzt oder beschädigt
- Wenn Sie ein wiederverwendbares SmartPeg verwenden, vergewissern Sie sich, dass es vor dem Gebrauch geprüft wurde und nicht häufiger als 20 Mal wiederaufbereitet wurde. Ein wiederverwendbares SmartPeg, das abgenutzt oder verbogen oder dessen Gewinde beschädigt ist, vibriert nicht richtig, sodass das Instrument ggf. keinen Messwert anzeigt.
- Ein Einweg-SmartPeg ist nur für eine Behandlungssitzung bestimmt.
- Stellen Sie sicher, dass das SmartPeg fest auf dem Implantat sitzt und nicht in Kontakt mit dem umgebenden Gewebe kommt, da dies eine genaue Signalerfassung verhindern und dazu führen kann, dass kein oder ein falscher ISQ-Wert erfasst wird.
- Elektromagnetische Störungen
Starke in der Nähe befindliche elektromagnetische Störquellen können die Messung beeinträchtigen. (Einzelheiten siehe die häufig gestellten Fragen und Antworten zu elektromagnetischen Störungen.)

Nein. Das Messgerät von Osstell beeinträchtigt das Implantat nicht. Das Instrument bringt nur das SmartPeg zum Vibrieren. Der Magnet des SmartPeg wird durch vom Gerät erzeugte Magnetimpulse mit sehr geringer Energie aktiviert. Die Methode ist objektiv, schonend und in hohem Maße reproduzierbar.
Ja, an Patienten mit Herzschrittmacher können ISQ-Messungen durchgeführt werden.
Als Vorsichtsmaßnahme sollte die Sonde aufgrund der während der Messung abgegebenen Magnetimpulse vom Brustbereich, in dem sich der Herzschrittmacher befindet, ferngehalten werden.
Es liegen veröffentlichte Berichte zum Thema Herzschrittmacher und Magnetfelder vor, die als weitere Informationsquelle dienen können.
Die Implantatstabilität kann in verschiedenen Behandlungsphasen gemessen werden.
Sie wird in der Regel bei der Implantatinsertion gemessen, um einen Ausgangswert zu ermitteln, und anschließend während der Einheilphase, um Veränderungen hinsichtlich der Stabilität und der Osseointegration zu überwachen. Oft wird vor der Belastung eine abschließende Messung durchgeführt, um die Entscheidung zu untermauern.
Wiederholte Messungen im zeitlichen Verlauf liefern wertvolle Informationen, da die Entwicklung der ISQ-Werte als Orientierungshilfe für klinische Entscheidungen dient.
Osseointegration in der Zahnmedizin
Die Implantatstabilität kann in verschiedenen Behandlungsphasen gemessen werden.
Sie wird in der Regel bei der Implantatinsertion gemessen, um einen Ausgangswert zu ermitteln, und anschließend während der Einheilphase, um Veränderungen hinsichtlich der Stabilität und der Osseointegration zu überwachen. Oft wird vor der Belastung eine abschließende Messung durchgeführt, um die Entscheidung zu untermauern.
Wiederholte Messungen im zeitlichen Verlauf liefern wertvolle Informationen, da die Entwicklung der ISQ-Werte als Orientierungshilfe für klinische Entscheidungen dient.
Questions about the Osstell IDx
You can record ISQ at abutment level in OsstellConnect, but it is important to follow the correct clinical measurement procedure to obtain accurate values.
How to measure ISQ at abutment level
- Perform an implant level measurement first, before placing the abutment.
- Measure again at abutment level during the same session, using a SmartPeg made for abutment level measuring.
- Determine the offset by noting the difference between implant level and abutment level ISQ. This offset remains stable throughout healing and should be used when interpreting follow-up measurements.
- For all subsequent visits, measure on the abutment and apply the same offset to understand the true implant ISQ.
How to record the measurement in OsstellConnect:
- Go to the patient’s register, select the patient and the implant in the tooth chart. Click ‘Add abutment’, choose the abutment, and save.
- Select ‘Measure stability’ and choose ‘Abutment’ under Measurement level. Measure on the abutment as you would at implant level and save.
- To review the stability trend, open the Stability tab and toggle ‘Show abutment’. You can also enable ‘Show details’ to view buccal–lingual and mesial–distal ISQ values.
For a more detailed explanation and clinical guidance, see our blog post here.
Navigate to your clinic in your account. Select the instrument tab. Click on Download firmware.
Download instructions:
• Wait for the download to complete (could take a while depending on your connection)
• Copy the .m2f binary file to a USB memory stick
• Insert the memory stick in your IDx while it is running
• Follow instructions on the IDx display
Note: you cannot open or view the .m2f file
You can also check this guide
Osstell Beacon
• To find your registration code, please make sure that you have already installed the Beacon Gateway. If you have not installed it yet, please navigate to your clinic in your account, click the instruments tab and download the gateway. Install it.
• Take your instrument in hand. It is now connecting to OsstellConnect and you should see a symbol animating. Please note that it can take a few seconds.
• When connected, the symbol stops animating.
• The registration code is now displayed on the lower screen of your instrument.
Osstell IDx
• When turning on your Osstell IDx for the first time, you will be prompted to select language, time zone, date and time.
• After that, you will need to set up a 4-digit pin code and a backup password. The backup password is needed when restoring to a backup, so please note it down and save it in a safe place.
• Your registration code is now displayed on your Osstell IDx.
Two years.
The IDx continues to consume a small amount of power even when switched off. If the battery becomes fully depleted (0%), the stored date and time settings will be lost.
When this happens, you will be prompted to set the date and time again at start-up.
If your IDx is connected to the internet, the date and time will be set automatically.
An electromagnetic noise warning indicates the presence of an external or internal magnetic disturbance that may affect the measurement.
This can occur due to nearby electronic equipment, or if the probe is held very close to the instrument itself.
ISQ should always be measured in two directions, because implant stability can vary depending on the amount of surrounding bone in different directions. Measuring from two angles ensures that both the most and the least stable directions are captured.
To do this, take one measurement in the buccal-lingual direction and one in the mesial-distal direction. These two ISQ values represent the different stability directions. Sometimes the values are identical; sometimes they differ.
If the two measurements differ, always rely on the lowest ISQ value, as it reflects the weakest direction and therefore provides the most clinically relevant information about implant stability.
Register your IDx by following the instructions in the device or by following this link.
Osstell measures implant stability using Resonance Frequency Analysis (RFA). The small SmartPeg that you attach to the implant has a tiny magnet on top. When the probe sends magnetic pulses, the SmartPeg starts to vibrate – similar to a very small tuning fork.
How it works:
- The instrument tip sends magnetic pulses
These pulses make the SmartPeg vibrate without touching it. - The vibration changes depending on how stable the implant is
– A stable implant (good bone support) makes the SmartPeg vibrate faster.
– A less stable implant makes it vibrate slower. - The device converts this vibration into an ISQ value
– Higher stability → higher frequency → higher ISQ
– Lower stability → lower frequency → lower ISQ
It takes less than a second, and the ISQ value is shown immediately.
For normal use, the batteries last for at least one day but in most cases longer. It takes about 2 hours to charge the IDx from a fully discharged state.
Choose a tooth position on the touch screen and start measuring.
Perform measurements, press End patient, and then save as Add new patient.
Simply select the pen symbol in the patient list to edit.
The patient data can be saved either in the instrument or in OsstellConnect.
Values can only be removed before saving clicking on the trash bin symbol. After saving the data cannot be modified.
Yes, OsstellConnect is accessible via iPhone, iPad, Mac or PC.
Have you registered your device? You can only use the Osstell IDx for a limited time without registration.
The following products may be autoclaved (over-pressurized steam up to 135 deg Celsius):
- SmartPeg Mount
- Reusable SmartPeg
- Probe (IDx)
Please note that single-use SmartPegs are disposable and cannot be autoclaved!
To enable automatic backup of your Osstell IDx, you will be asked to create a backup code made up of 8 characters. The purpose of the backup is to reset the unit if you for some reason remove patients by mistake or lose your instrument. The code is created during the registration process and you only have to enter it once. To make sure you can access your backup at a later date, it is VERY important that you write this code down and keep it in a safe place.
Backup can also be done via USB without a code.
Questions about Osstell and the ISQ scale
ISQ (Implant Stability Quotient) is a numerical value from 1 to 99 that describes implant stability. It is calculated from the resonance frequency measured when the Osstell instrument sends a magnetic pulse to a SmartPeg attached to the implant, translating this into a clinically intuitive value.

There is no single ISQ value that determines when an implant can be loaded. The decision depends on the stability over time (the ISQ trend), as well as clinical judgement and patient-specific risk factors.
As a general guideline, higher ISQ values provide greater confidence, and values around 70 or above are often considered suitable for loading non-splinted implants. For splinted restorations, lower values may be acceptable.
For guidance on how to interpret ISQ values, see the Osstell ISQ Scale.
ISQ should always be measured in two directions, because implant stability can vary depending on the amount of surrounding bone in different directions. Measuring from two angles ensures that both the most and the least stable directions are captured.
To do this, take one measurement in the buccal-lingual direction and one in the mesial-distal direction. These two ISQ values represent the different stability directions. Sometimes the values are identical; sometimes they differ.
If the two measurements differ, always rely on the lowest ISQ value, as it reflects the weakest direction and therefore provides the most clinically relevant information about implant stability.
There is no single ISQ value that determines suitability for immediate loading. In addition to the ISQ value, the decision depends on primary stability, clinical judgement, and patient-specific risk factors.
As a general guide, higher ISQ values indicate greater stability, and values around 70 or above may support immediate loading in appropriate cases.
For guidance on interpreting ISQ values, see the Osstell ISQ Scale.
Osstell measures the lateral stability of the implant and thereby indirectly the degree of osseointegration. The results are presented as an ISQ, ranging from 1-99 ISQ, which correlates to micro mobility.
Osstell measures implant stability using Resonance Frequency Analysis (RFA). The small SmartPeg that you attach to the implant has a tiny magnet on top. When the probe sends magnetic pulses, the SmartPeg starts to vibrate – similar to a very small tuning fork.
How it works:
- The instrument tip sends magnetic pulses
These pulses make the SmartPeg vibrate without touching it. - The vibration changes depending on how stable the implant is
– A stable implant (good bone support) makes the SmartPeg vibrate faster.
– A less stable implant makes it vibrate slower. - The device converts this vibration into an ISQ value
– Higher stability → higher frequency → higher ISQ
– Lower stability → lower frequency → lower ISQ
It takes less than a second, and the ISQ value is shown immediately.
Periotest (DCA) measurements are designed for natural teeth, which are connected to the bone via the periodontal ligament. In contrast, dental implants are anchored directly to the bone without a periodontal ligament.
RFA measurements using Osstell instruments assess implant stability by measuring the stiffness of the bone–implant interface. They provide an objective and repeatable value on a more sensitive scale, supporting reliable assessment over time.
ISQ and BIC measure different aspects of implant integration.
BIC (bone-to-implant contact) describes the percentage of the implant surface in contact with bone at a microscopic level, while ISQ reflects implant stability by measuring the stiffness of the bone–implant interface.
As a result, high BIC does not always mean high stability, as bone quality and stiffness also play a key role.
For a more detailed explanation, see: How ISQ correlates to torque
Yes. The ISQ value can be affected if the SmartPeg is not mounted correctly.
For accurate measurements, the SmartPeg should be attached finger tight using the SmartPeg Mount, which corresponds to about 4–6 Ncm.
At this level, the SmartPeg has firm, stable contact with the implant, and the resulting ISQ value is consistent – typically within ±2 ISQ units.
- If the SmartPeg is not fully seated:
The contact becomes unstable, and the ISQ value can appear artificially low, or you don’t receive any value. - If too much force is applied:
Overtightening does not improve accuracy. It may damage the SmartPeg threads.
– A reusable SmartPeg may be damaged so it cannot be used again.
– A single use or reusable SmartPeg may have its threads deformed, which can lead to inaccurate measurements during that session or, in worst case a broken SmartPeg.
In short: finger tight (4–5 Ncm) is enough to ensure stable contact and reliable ISQ readings.
Clinically, the lowest ISQ values typically seen are around 40.
If the stability is below 30, the implant is generally considered to have very low stability or to be loose. It may also indicate that the SmartPeg is not correctly mounted on the implant.
Very low values (below 20) are rarely seen in clinical situations and are more commonly observed in laboratory models with artificially low stability.