FAQ

Support

常见问题

了解更多关于我们的产品、ISQ 量表及其使用方法 OsstellConnect、Osstell 技术等问题的信息。
关于 SmartPeg 的问题
Can the reusable SmartPeg be sterilised according to the Prion cycle?

Yes, it can be sterilised with a Prion cycle at 134 °C for 18 minutes.

如何将 SmartPeg 安装到种植体上?

无论使用一次性使用型 SmartPeg 还是可重复使用型 SmartPeg,均须使用 SmartPeg Mount 进行安装,并用手指拧紧至合适力度 – 约 4–6 Ncm。这样可以确保 SmartPeg 正确就位并获得准确的 ISQ 测量结果,同时避免损坏种植体或 SmartPeg。

Can I mix single-use and reusable SmartPegs in the same treatment session?

Yes. You can mix single-use and reusable SmartPegs during the same treatment session. The only requirement is that you use the correct SmartPeg Type number for the specific implant or abutment you are measuring.

Whether the SmartPeg is single-use or reusable does not affect the measurement.

可重复使用型 SmartPeg 是否能提供与一次性使用型 SmartPeg 相同的 ISQ 值?

可以,前提是其完整性和性能保持良好。

Osstell 也是唯一一家同时提供无菌一次性使用型 SmartPeg 和铝制可重复使用型 SmartPeg 的公司,其 ISQ 测量方法已获得超过 1,500 项已发表研究的支持。

使用 Osstell 原创型 ISQ 量表和 SmartPeg 时,无需使用换算表或校正系数。无论使用一次性使用型 SmartPeg 还是可重复使用型 SmartPeg,测得的 ISQ 值均为真实值。

How are the different SmartPegs packed?

SmartPegs are supplied in different packaging formats depending on whether they are single-use or reusable:

Single-use SmartPegs

  • Delivered sterile.
  • Supplied in boxes of 5 pieces, in a single sterile barrier system with protective outer packaging.
  • Intended for one treatment session only and must not be reused.

Reusable SmartPegs

  • Delivered nonsterile in individual packaging.
  • Must be cleaned, disinfected and sterilized before the first clinical use and after every subsequent use. (See quickguide at osstell/ifu).

SmartPeg Mount

  • Delivered nonsterile with the instrument.
  • Can be purchased separately, in package of 5.
  • Must also be cleaned, disinfected and sterilized before use and between patients. (See quickguide at osstell/ifu).
Is there a visual difference between the single-use and reusable SmartPeg?

Yes. The reusable and single use SmartPegs are designed so they can be easily distinguished visually:

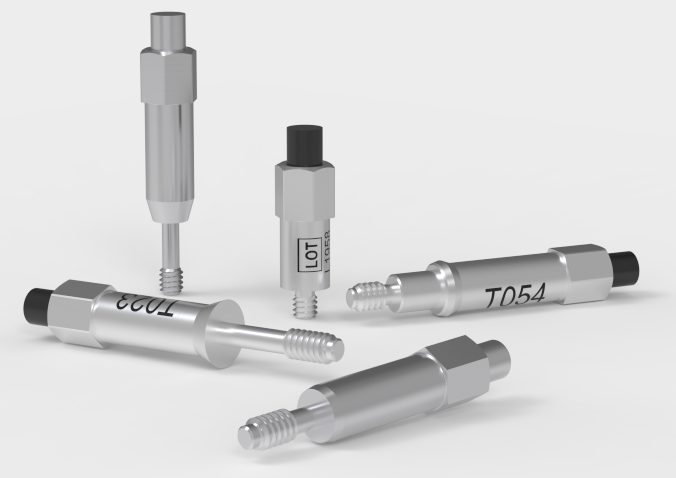
  • The single-use SmartPeg is supplied sterile, has an aluminium coloured (non coloured) magnet, and does not include any laser marked identifiers on the body.
  • The reusable SmartPeg has a black magnet on top and carries laser marked Type and LOT numbers on the body for identification and traceability.

SmartPeg 可以使用多少次?

在保持完整性和性能良好的情况下,可重复使用型 SmartPeg 最多可重复处理 20 次。
如果检查发现 SmartPeg 存在磨损、变形、腐蚀、螺纹损坏或任何功能兼容性下降的情况,那么即使其重复处理次数不到 20 次,也必须弃置该 SmartPeg。
次性使用型 SmartPeg 仅适用于一次治疗过程,不得进行重复处理。

Why can the reusable SmartPeg be cleaned and sterilised when the single-use SmartPeg cannot, even though both are made of aluminium?

The reusable SmartPeg is engineered with special protective surface coating – one on the SmartPeg body and another black protective coating on the magnet. These coatings provide resistance to moisture, cleaning chemicals, wear, and corrosion, ensuring that the SmartPeg maintains its performance throughout the validated number of reprocessing cycles.

The reusable SmartPeg can easily be distinguished from the single use version: it has a black magnet, and its LOT and Type number are laser marked on the body for clear identification.

如何对可重复使用型 SmartPeg 和 SmartPeg Mount 进行清洁和灭菌?

在首次临床使用前以及每次使用后,必须按照此处快速指南中的说明,对可重复使用型产品进行清洁、消毒和灭菌:Osstell/ifu

如何在基牙上测量并记录 ISQ?

您可以在 OsstellConnect 中记录基牙水平的 ISQ 值,但必须遵循正确的临床测量流程,以获取准确的测量结果。

如何测量基牙水平的 ISQ 值

  1. 在安装基牙之前,先进行种植体水平测量。
  2. 在同一次治疗过程中,使用专用于基牙水平测量的 SmartPeg 再次进行基牙水平测量。
  3. 记录种植体水平 ISQ 值与基牙水平 ISQ 值之间的差值,以确定偏移值。该偏移值在整个愈合过程中保持稳定,后续解读随访测量结果时应使用该偏移值。
  4. 在之后的所有复诊中,在基牙处进行测量,并应用相同的偏移值,即可了解种植体真实的 ISQ 值。

如何在 OsstellConnect 中记录测量结果:

  1. 进入患者注册页面,在牙位图中选择患者和种植体。点击“添加基牙”,选择基牙并保存。
  2. 选择“测量稳定性”,并在“测量水平”下选择“基牙”。按照种植体水平测量的方法,在基牙处进行测量并保存。
  3. 如需查看稳定性趋势,请打开“稳定性”选项卡,并切换“显示基牙”。您还可以启用“显示详情”,查看颊舌向和近远中向 ISQ 值。

如需更详细的说明和临床指导,请参阅此处的博文。

为什么需要在同一次测量过程中进行两次测量?

ISQ 始终应从两个方向进行测量,因为种植体稳定性可能会因不同方向的周围骨量不同而有所差异。从两个角度进行测量,可以确保获取稳定性最高和最低方向的数据。
为此,请分别在颊舌向和近远中向各进行一次测量。这两个 ISQ 值分别代表不同方向的稳定性。两个测量值有时相同,有时则不同。
如果两个测量值不同,务必以较低的 ISQ 值为准,因为该值反映了稳定性较弱的方向,因此能够提供与临床最相关的种植体稳定性信息。

Do I need a torque device to tighten the SmartPeg correctly?

No. A torque device should not be used to tighten the SmartPeg.

SmartPegs should always be mounted using the SmartPeg Mount and tightened to approximately 4–6 Ncm, which is typically described as finger tight.

This ensures the SmartPeg is seated correctly without risking damage to the implant connection.

Osstell 技术的工作原理是什么?

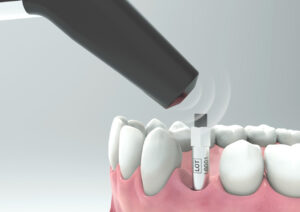
Osstell 使用共振频率分析(RFA)技术测量种植体稳定性。安装在种植体上的小型 SmartPeg 顶部有一块微型磁铁。当探头发送磁脉冲时,SmartPeg 会始振动 – 类似于一块非常小的振动音叉。
工作原理:

  1. 器械发送磁脉冲
    这些磁脉冲会让 SmartPeg 在不接触的情况下产生振动。
  2. 振动会随种植体的稳定性而变化
    • 种植体越稳定(骨支撑良好),SmartPeg 的振动速度越快。
    • 种植体越不稳定,SmartPeg 的振动速度越慢。
  3. 器械会将该振动转换为 ISQ 值
    • 稳定性越高 → 频率越高 → ISQ 值越高
    • 稳定性越低 → 频率越低 → ISQ 值越低

测量耗时不到 1 秒,并会立即显示 ISQ 值。

SmartPeg 的拧紧方式是否会影响 ISQ 值?

会。如果 SmartPeg 未正确安装,ISQ 值可能会受到影响。

为确保测量准确,应使用 SmartPeg Mount 将 SmartPeg 拧紧至手指拧紧力度,即约 4–6 Ncm

在此力度下,SmartPeg 可与种植体保持牢固稳定的接触,所得 ISQ 值保持一致,通常误差范围为 ±2 个 ISQ 单位

  • 如果 SmartPeg 未完全就位:
    此时接触会变得不稳定,ISQ 值可能会出现异常偏低,或者无法获得测量值。
  • 如果施力过大:
    过度拧紧不会提高测量准确性,反而可能损坏 SmartPeg 螺纹。

    • 可重复使用型 SmartPeg 可能会因此损坏,导致无法再次使用。
    • 一次性或可重复使用型 SmartPeg 的螺纹可能变形,从而导致该次过程的测量结果不准确,严重情况下可能造成 SmartPeg 断裂。

简而言之:手指拧紧 (4–5 Ncm) 即可确保稳定接触并获得可靠的 ISQ 读数。

Which Osstell products can be autoclaved?

The following products may be autoclaved (over-pressurized steam up to 135 deg Celsius):

  • SmartPeg Mount
  • Reusable SmartPeg
  • Probe (IDx)

Please note that single-use SmartPegs are disposable and cannot be autoclaved!

如何为我的种植体选择正确的 SmartPeg?

不同的种植体需要使用相应的 SmartPeg,以确保测量准确。每个 SmartPeg 都与特定的种植体系统和连接类型相匹配。

在 SmartPeg 参考指南中,可以查找适用于自身种植体的 SmartPeg – 点击此处访问指南。

关于 OsstellConnect 的问题

如何在基牙上测量并记录 ISQ?

您可以在 OsstellConnect 中记录基牙水平的 ISQ 值,但必须遵循正确的临床测量流程,以获取准确的测量结果。

如何测量基牙水平的 ISQ 值

  1. 在安装基牙之前,先进行种植体水平测量。
  2. 在同一次治疗过程中,使用专用于基牙水平测量的 SmartPeg 再次进行基牙水平测量。
  3. 记录种植体水平 ISQ 值与基牙水平 ISQ 值之间的差值,以确定偏移值。该偏移值在整个愈合过程中保持稳定,后续解读随访测量结果时应使用该偏移值。
  4. 在之后的所有复诊中,在基牙处进行测量,并应用相同的偏移值,即可了解种植体真实的 ISQ 值。

如何在 OsstellConnect 中记录测量结果:

  1. 进入患者注册页面,在牙位图中选择患者和种植体。点击“添加基牙”,选择基牙并保存。
  2. 选择“测量稳定性”,并在“测量水平”下选择“基牙”。按照种植体水平测量的方法,在基牙处进行测量并保存。
  3. 如需查看稳定性趋势,请打开“稳定性”选项卡,并切换“显示基牙”。您还可以启用“显示详情”,查看颊舌向和近远中向 ISQ 值。

如需更详细的说明和临床指导,请参阅此处的博文。

How should I document an implant failure?

• To document an implant failure, go to your patients records. Select the patient, then select the tooth. Click ‘Mark as failed’. Choose the type of failure (early or late failure), fill in the failure date. Choose the reason for failure. Click ‘Mark as failed’.

• You can access the history of the implant failure by navigating to the history tab. Click the tab ‘Failed’ to see all information related to the treatment and the failure.

• A history symbol is displayed on the tooth with a failed implant.

如何将 Osstell IDx 中的数据上传到 OsstellConnect?

如果 Osstell IDx 已联网,其中的数据会自动上传到您的 OsstellConnect 帐户。如需将设备联网,请按照此处的说明操作。

请注意,您还可以创建备份,例如备份到 U 盘。请按照此处的说明进行操作。


https://osstell.com/app/uploads/How-to-connect-to-the-Internet-6.0.pdf

https://osstell.com/app/uploads/Backup-Osstell-IDx-6.0.pdf

如何将 Osstell Beacon 连接到 OsstellConnect 并直接记录数据?

在开始前,请确保您已安装 Beacon Gateway。如果尚未安装,请在帐户中进入您的诊所页面,点击器械选项卡并下载网关。进行安装。

  • 将 Osstell Key 插入计算机的 USB 端口。
  • 手持器械。此时器械正在连接到 OsstellConnect,您应当会看到以下符号正在闪烁。请注意,连接可能需要几秒钟。
  • 连接成功后,该符号将停止闪烁。
  • 进入患者记录。
    • 如果是首次测量,请创建患者记录。填写患者信息并保存。点击“新建治疗”,填写治疗信息。点击“添加种植体”,填写种植体信息并保存。点击“测量稳定性”。
    • 如果是随访测量,请选择患者,然后在牙位图中选择牙齿。点击“测量稳定性”。
  • 在颊舌向进行测量。此时 ISQ 值会显示在 OsstellConnect 中。
  • 在近远中向进行测量。此时 ISQ 值会显示在 OsstellConnect 中。
  • 填写治疗相关信息并保存。
Can I delete a measurement?

Yes, simply navigate to your patient records. Select the patient. Select the implant. Go to the stability tab. Click on the edit icon by the measurement you would like to delete. Click delete. Please note that the measurement will be permanently removed from the patient chart.

Can I delete a patient?

Yes, simply navigate to your patient records. Select the patient you would like to delete. Click delete in the upper right corner. Confirm that you want to delete the patient and all data. Please note that it will be permanently removed from your account.

能否导出我所有的数据?

可以。您可以将所有数据导出为 Excel 文件,供进一步分析。只需进入患者记录并点击 CSV 导出即可。该文件会出现在您的下载文件夹中。

请确保所有导出的数据均按照适用的数据保护法规进行处理,例如《GDPR》或《HIPAA》。

Can I manually edit implant data?

Yes, simply navigate to your patient records. Select the patient. Select the implant you want to edit on the tooth chart. Select the tab ‘Implant & abutment’. Click on the pen icon to edit. Edit implant data. Save.

How can I edit patient data?

Simply navigate to your patient records. Select the patient. Click ‘edit’ on the top right corner. Edit the data and save.

How can I find the serial number (SN)?

You can find the serial number on the back of your instrument.

How can I find my registration code?

Osstell Beacon
• To find your registration code, please make sure that you have already installed the Beacon Gateway. If you have not installed it yet, please navigate to your clinic in your account, click the instruments tab and download the gateway. Install it.
• Take your instrument in hand. It is now connecting to OsstellConnect and you should see a symbol animating. Please note that it can take a few seconds.
• When connected, the symbol stops animating.
• The registration code is now displayed on the lower screen of your instrument.

Osstell IDx
• When turning on your Osstell IDx for the first time, you will be prompted to select language, time zone, date and time.
• After that, you will need to set up a 4-digit pin code and a backup password. The backup password is needed when restoring to a backup, so please note it down and save it in a safe place.
• Your registration code is now displayed on your Osstell IDx.

关于 Osstell Beacon 的问题

关于 Osstell Beacon 的问题

Osstell 器械的保修期是多少?

Osstell Beacon – 2 年
W&H Osstell Classic – 1 年

如何清洁器械?

每次使用前,使用推荐的(参阅下表)表面清洁剂用湿巾或软布擦拭整个器械。

可接受的清洁剂:

  • 浓度为 70% 的异丙醇溶液
  • 低泡中性活性酶清洁剂,如:
    • BePro 消毒湿巾,REF 19500102,www.wh.com(可通过 W&H Sterilization 订购)
    • Medizime LF
    • Enzol

请勿使用:

  • 酸性或酚类清洁剂/消毒剂
  • 任何类型的强碱性清洁剂,包括洗手液和洗洁精
  • 漂白清洁剂
  • 过氧化氢清洁剂
  • 磨蚀性清洁剂
  • 丙酮或烃类清洁剂
  • MEK(甲乙酮)
  • Birex
  • 戊二醛
  • 季铵氯化物盐基清洁剂

本器械无需进行定期维护。如果器械发生故障,请联系当地的销售代表或经销商获取更多说明。

如何在基牙上测量并记录 ISQ?

您可以在 OsstellConnect 中记录基牙水平的 ISQ 值,但必须遵循正确的临床测量流程,以获取准确的测量结果。

如何测量基牙水平的 ISQ 值

  1. 在安装基牙之前,先进行种植体水平测量。
  2. 在同一次治疗过程中,使用专用于基牙水平测量的 SmartPeg 再次进行基牙水平测量。
  3. 记录种植体水平 ISQ 值与基牙水平 ISQ 值之间的差值,以确定偏移值。该偏移值在整个愈合过程中保持稳定,后续解读随访测量结果时应使用该偏移值。
  4. 在之后的所有复诊中,在基牙处进行测量,并应用相同的偏移值,即可了解种植体真实的 ISQ 值。

如何在 OsstellConnect 中记录测量结果:

  1. 进入患者注册页面,在牙位图中选择患者和种植体。点击“添加基牙”,选择基牙并保存。
  2. 选择“测量稳定性”,并在“测量水平”下选择“基牙”。按照种植体水平测量的方法,在基牙处进行测量并保存。
  3. 如需查看稳定性趋势,请打开“稳定性”选项卡,并切换“显示基牙”。您还可以启用“显示详情”,查看颊舌向和近远中向 ISQ 值。

如需更详细的说明和临床指导,请参阅此处的博文。

How can I find the serial number (SN)?

You can find the serial number on the back of your instrument.

How can I find my registration code?

Osstell Beacon
• To find your registration code, please make sure that you have already installed the Beacon Gateway. If you have not installed it yet, please navigate to your clinic in your account, click the instruments tab and download the gateway. Install it.
• Take your instrument in hand. It is now connecting to OsstellConnect and you should see a symbol animating. Please note that it can take a few seconds.
• When connected, the symbol stops animating.
• The registration code is now displayed on the lower screen of your instrument.

Osstell IDx
• When turning on your Osstell IDx for the first time, you will be prompted to select language, time zone, date and time.
• After that, you will need to set up a 4-digit pin code and a backup password. The backup password is needed when restoring to a backup, so please note it down and save it in a safe place.
• Your registration code is now displayed on your Osstell IDx.

如何开始?

首先为器械充电约 3 小时,以确保最佳性能。

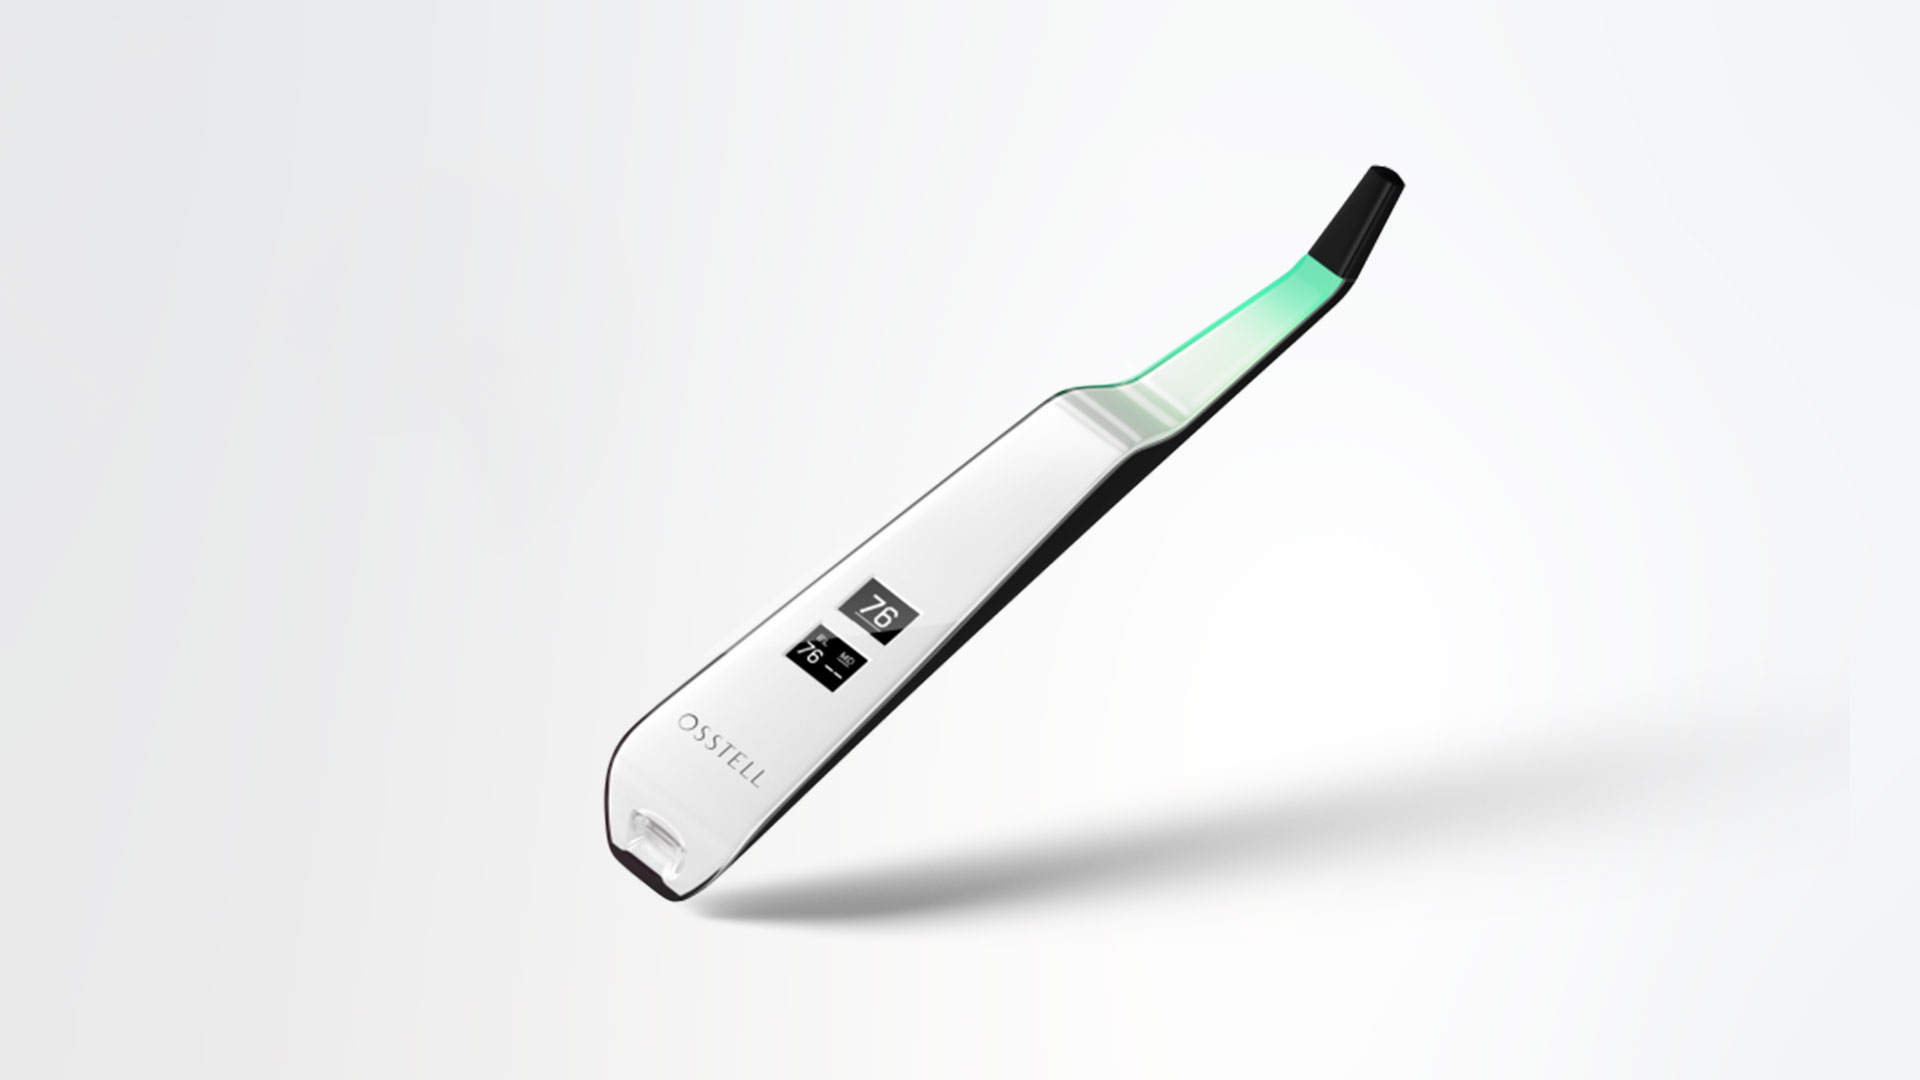
Osstell Beacon 在移动时会自动启动,显示电池状态,然后即可进行 BL(颊舌向)方向的测量。

将器械靠近 SmartPeg 或 TestPeg 开始测量。测量完成后,仪器会发出提示音,同时显示 ISQ 值,并通过红、黄、绿三种颜色指示稳定性。

器械启动后,在完成注册前会显示 OsstellConnect 代码。您可以在此处注册您的器械:注册 OsstellConnect。

在 60 秒内无移动后,器械会自动关闭。

How do I measure with the Osstell Beacon?

Video on how to measure: Measure with Osstell Beacon

1. Activate the Osstell Beacon by picking it up. The instrument will start-up and after showing the battery status, the instrument will be ready for measurement in the BL (Buccal – Lingual) direction, which is prompted in the upper display as well as optimal angle towards the Smartpeg.

2. Place a barrier sleeve over the Osstell beacon instrument.

3. Place the SmartPeg into the SmartPeg Mount. The SmartPeg is magnetic, and the SmartPeg Mount will hold the SmartPeg. See fig 2. Attach the SmartPeg to the implant or abutment by screwing the SmartPeg Mount using finger force of approximately 4-6 Ncm. Do not over-tighten, to avoid damaging the SmartPeg threads.

4. Hold the instrument tip close (2-4mm) to the top of the SmartPeg without touching it. Sometimes, you will need to go as close as 1 mm. An audible sound indicates when measurement has started, and measured data will be shown in the upper display combined with a colored light indication below the tip.

5. Bring the instrument out of the mouth to clearly read the ISQ value and the colored indication. The measured ISQ values will be displayed in the upper display for a couple of seconds and then switch to be ready for measurement in mesial-distal direction.

6. Repeat step 4 and the sequence starts over and the Osstell Beacon is ready for measurement in the BL (Buccal- Lingual) direction again.

7. When all measurements are performed, remove the SmartPeg by using the SmartPeg Mount. The instrument is automatically turned off after 60 seconds of inactivity.

在测量时,为什么会获得意外值或无度数的现象?

可能的原因包括:


重复使用 SmartPeg: SmartPeg 为一次性器件,仅应在一次治疗过程中为单个患者进行一次或多次测量时使用。反复使用会因软铝螺纹磨损而导致读数不准确。

为种植体选择了错误的 SmartPeg 类型: 请参阅 SmartPeg 参考列表:osstell.com/smartpegguide

SmartPeg 与种植体之间存在骨或软组织: 连接 SmartPeg 前,请确保清洁种植体的修复连接部位。

电磁干扰: 排除电磁干扰源。

探头距离 SmartPeg 过远: 将探头保持在距离 SmartPeg 2–4 mm 处。

How do I get started?

Although it is possible to use the Osstell Beacon directly, depending on the status of the built-in rechargeable battery, it is recommended to charge the battery for at least 3 hours before using the Osstell Beacon instrument.

The Osstell Beacon is activated by a built-in motion sensor. As soon as the motion sensor detects movement, the Osstell Beacon will start-up and shortly show battery status and then be ready for measurement in the BL (Buccal – Lingual) direction, which is indicated in the upper display.

The Osstell Beacon will start to measure, indicated by an audible sound, when near an Osstell SmartPeg or Test peg due to a built-in magnetic detector that senses the magnet on the top of the Osstell SmartPeg/TestPeg. Measured data will be shown in the upper display combined with a colored light indication below the tip.

The red, yellow and green color indicates if the measured ISQ value corresponds to a low, medium or high implant stability according to the ISQ scale guidance, click here for more information.

After 60 seconds of no motion, the Osstell Beacon will turn off automatically.

如何使用 Osstell Beacon 进行测量?

测量视频:使用 Osstell Beacon 进行测量

  1. 拿起 Osstell Beacon 即可激活。器械随即启动,并在显示电池状态后进入测量准备状态,可进行 BL(颊侧–舌侧)方向的测量。上方显示屏会提示当前测量方向以及 SmartPeg 的最佳测量角度。
  2. 将隔离套套在 Osstell Beacon 器械上。
  3. 将 SmartPeg 放入 SmartPeg Mount 中。SmartPeg 带有磁性,SmartPeg Mount 会固定住 SmartPeg。请参见图 2。使用 SmartPeg Mount 以约4–6 Ncm 的手指拧紧力度,将 SmartPeg 安装到种植体或基牙上。请勿过度拧紧,以免损坏 SmartPeg 螺纹。
  4. 将器械尖头靠近 SmartPeg 顶部(距离 2–4 mm),但不要接触 SmartPeg。有时需要靠近至 1 mm。发出提示音表示测量开始,测量数据会显示在上方显示屏中,同时尖头下方会显示彩色指示灯。
  5. 将器械移出口腔,以便清楚查看 ISQ 值和指示的颜色。测得的 ISQ 值会在上方显示屏中显示数秒,随后器械会切换至近远中方向,进入测量准备状态。
  6. 重复步骤 4,测量流程将重新开始,此时 Osstell Beacon 会再次准备进行 BL(颊舌向)方向的测量。
  7. 完成所有测量后,使用 SmartPeg Mount 拆下 SmartPeg。如超过 60 秒未使用,器械将会自动关闭。
How do I measure with the Osstell Beacon?

1. Activate the Osstell Beacon by picking it up. The instrument will start-up and after showing the battery status, the instrument will be ready for measurement in the BL (Buccal – Lingual) direction, which is prompted in the upper display as well as optimal angle towards the Smartpeg.

2. Place a barrier sleeve over the Osstell beacon instrument.

3. Place the SmartPeg into the SmartPeg Mount. The SmartPeg is magnetic, and the SmartPeg Mount will hold the SmartPeg. See fig 2. Attach the SmartPeg to the implant or abutment by screwing the SmartPeg Mount using finger force of approximately 4-6 Ncm. Do not over-tighten, to avoid damaging the SmartPeg threads.

4. Hold the instrument tip close (2-4mm) to the top of the SmartPeg without touching it. Sometimes, you will need to go as close as 1 mm. An audible sound indicates when measurement has started, and measured data will be shown in the upper display combined with a colored light indication below the tip.

5. Bring the instrument out of the mouth to clearly read the ISQ value and the colored indication. The measured ISQ values will be displayed in the upper display for a couple of seconds and then switch to be ready for measurement in mesial-distal direction.

6. Repeat step 4 and the sequence starts over and the Osstell Beacon is ready for measurement in the BL (Buccal- Lingual) direction again.

7. When all measurements are performed, remove the SmartPeg by using the SmartPeg Mount. The instrument is automatically turned off after 60 seconds of inactivity.

Why is it that I get unexpected values or no readings when measuring?

Possible explanations include:

Re-Used SmartPeg: The SmartPegs are disposable and should only be used for one or multiple measurement at one treatment session, for a single patient only. Repeated re-use may result in false readings due to wear and tear of the soft aluminum SmartPeg threads.

Wrong SmartPeg type selected for the implant: See SmartPeg reference list, osstell.com/smartpegguide

Bone or soft tissue in between SmartPeg and Implant: Make sure to clean the Implant prosthetic connection before attaching the SmartPeg.

Electromagnetic interference: Remove the source of electromagnetic interference.

Probe is held too far away from the SmartPeg: Hold the probe 2-4 mm away from the SmartPeg.

Do I need to be connected to WiFi?

You can have your Osstell Beacon online connected to OsstellConnect for data collection, but it is not a requirement. OsstellConnect is an online tool for statistical analysis and valuable insights based on your data. Before you can start using data connection to OsstellConnect you have to register your Osstell Beacon. The serial number can be found on the back of the instrument. For registration assistance and features of data connection to OsstellConnect, please visit osstellconnect.com/beacon

What is the warranty on the Osstell Beacon?

2 years

How do I clean the Osstell Beacon?

Before each use, moisten a gauze or soft cloth with an acceptable (see list below) surface disinfectant and wipe the whole Osstell Beacon instrument. Note! Do not autoclave the Osstell Beacon instrument. Routinely check the surface of the instrument tip and overall surface for possible cracks and resins.

Acceptable Cleaners:
o Isopropyl alcohol
o Ethyl alcohol-based cleaners

Do not use:
o Strong alkali detergent of any type, including hand soaps and dish soaps Bleach based cleaners
o Hydrogen Peroxide based cleaners Abrasive Cleansers
o Acetone or hydrocarbon based cleaners MEK (Methyl Ethyl Ketone)
o Birex Gluteraldehyde
o Quaternary Ammonium Chloride salt-based cleaners

How do I engage / disengage transportation mode?

The Osstell Beacon is delivered from factory in a “transport” mode, where the built-in motion sensor is deactivated. To deactivate the transport mode and start charging, connect the small USB connector of the Osstell USB cable to wide end of the instrument. Connect the large USB connector to a standard USB outlet of a PC, laptop or charger.

When the Beacon doesn’t start or when the display is showing a wrench and a manual.

Charge the Beacon for at least 30 min in room temperature, then try again. If the error remains, try resetting the device by:

1. Identify the Beacon reset pin on the picture below.

2. With a paper clip, do a gentle press for 1 second on the reset button (Note! You may have to tilt the pin a little downwards).
If you see a “PadLock” symbol in the upper display, press one more time on the reset button.


If the Beacon still doesn’t start or the display is showing a wrench and a manual, then please contact your local sales representative or distributor or support@osstell.com.

Do I need to be connected to Wi‑Fi?

No, a Wi‑Fi connection is not required to use your Osstell Beacon. You can measure implant stability and document ISQ values manually in your patient journal or in OsstellConnect at a later stage.
If connected, the Osstell Beacon can communicate wirelessly with OsstellConnect, allowing measurements to be transferred and recorded automatically.
OsstellConnect is an online tool used for data collection, statistical analysis and clinical insights based on your measurements.
To use the data connection, your Osstell Beacon must first be registered. The serial number can be found on the back of the instrument. For registration guidance and more information, please visit https://osstellconnect.com/register

How do I switch the Osstell Beacon from transport mode to use mode?

The Osstell Beacon is delivered in transportation mode with the motion sensor deactivated. To switch modes, briefly connect the USB cable to the instrument and a USB port on a computer for a few seconds, then disconnect.

What should I do if the Osstell Beacon doesn’t start or when the display is showing a wrench and a manual?

Charge the Beacon for at least 30 min in room temperature, then try again. If the error remains, try resetting the device by:

1. Identify the Beacon reset pin on the picture below.

2. With a paper clip, do a gentle press for 1 second on the reset button (Note! You may have to tilt the pin a little downwards).
If you see a “PadLock” symbol in the upper display, press one more time on the reset button.


If the Beacon still doesn’t start or the display is showing a wrench and a manual, then please contact your local sales representative or distributor or support@osstell.com.

为什么需要在同一次测量过程中进行两次测量?

ISQ 始终应从两个方向进行测量,因为种植体稳定性可能会因不同方向的周围骨量不同而有所差异。从两个角度进行测量,可以确保获取稳定性最高和最低方向的数据。
为此,请分别在颊舌向和近远中向各进行一次测量。这两个 ISQ 值分别代表不同方向的稳定性。两个测量值有时相同,有时则不同。
如果两个测量值不同,务必以较低的 ISQ 值为准,因为该值反映了稳定性较弱的方向,因此能够提供与临床最相关的种植体稳定性信息。

是否有研究证明 Osstell 方法有效?

截至目前,已有数千篇发表的科学论文涉及 Osstell 器械的应用。在我们可以搜索的数据库“资源/科学数据库”中,可以找到这些论文摘要。

Osstell ISQ 量表基于这些研究结果建立,所有研究均使用 Osstell 器械和铝制 SmartPeg 完成。


科学数据库 – ISQ 种植体稳定性证据 – Osstell®

Osstell 技术的工作原理是什么?

Osstell 使用共振频率分析(RFA)技术测量种植体稳定性。安装在种植体上的小型 SmartPeg 顶部有一块微型磁铁。当探头发送磁脉冲时,SmartPeg 会始振动 – 类似于一块非常小的振动音叉。
工作原理:

  1. 器械发送磁脉冲
    这些磁脉冲会让 SmartPeg 在不接触的情况下产生振动。
  2. 振动会随种植体的稳定性而变化
    • 种植体越稳定(骨支撑良好),SmartPeg 的振动速度越快。
    • 种植体越不稳定,SmartPeg 的振动速度越慢。
  3. 器械会将该振动转换为 ISQ 值
    • 稳定性越高 → 频率越高 → ISQ 值越高
    • 稳定性越低 → 频率越低 → ISQ 值越低

测量耗时不到 1 秒,并会立即显示 ISQ 值。

如果未显示 ISQ 值该怎么办?

如果未显示 ISQ 值,通常表示器械未能清晰检测到 SmartPeg 振动。导致这种情况的因素有多种,大多数都容易解决:

  1. 器械距离过远
    器械通常应保持在距离 SmartPeg 顶部磁铁 2–4 mm 的位置。请勿触碰磁铁。如果未显示数值,请将器械靠近,直至检测到信号。
  2. 需要调整角度
    磁场有方向性,因此器械的方向会影响测量。测量时,器械应与 SmartPeg 顶部保持约 45°角。
  3. 确保为特定种植体选择正确类型的 SmartPeg
    请通过以下链接查找类型合适的 SmartPeg:查找我的 SmartPeg
  4. 软组织阻尼
    周围组织有时会比预期更明显地降低振动幅度。通常只需将器械稍微靠近即可补偿这一影响。
  5. 种植体平台不清洁
    请确保种植体平台清洁且无碎屑,以便 SmartPeg 正确就位并传递振动。
  6. SmartPeg 磨损或损坏
    • 如果您使用的是可重复使用型 SmartPeg,请确保在使用前完成检查,确认未超过 20 个重新处理循环。可重复使用型 SmartPeg 若是磨损、弯曲或螺纹损坏,将无法正常振动,器械可能无法读取测量值。
    • 一次性使用型 SmartPeg 仅适用于一次治疗过程。
    • 请确保 SmartPeg 已正确安装在种植体上,并且未与周围组织接触,因为这可能会阻碍准确检测信号,导致无法显示 ISQ 值或显示错误的 ISQ 值。
  7. 电磁干扰
    附近较强的电磁噪声源可能会干扰测量。(详情请参阅“电磁噪声”常见问题。)
使用 Osstell 器械是否会影响种植体?

不会。Osstell 测量不会影响种植体。该器械仅让 SmartPeg 产生振动。SmartPeg 中的磁铁由器械产生的极低能量磁脉冲激活。该技术具有客观、温和且高度可重复的特点。

能否为装有心脏起搏器的患者测量 ISQ?

可以。您可以对装有心脏起搏器的患者进行 ISQ 测量。
由于测量过程中会产生磁脉冲,可以将探头远离安装心脏起搏器的胸部区域,来作为预防措施。
有关心脏起搏器和磁场的更多参考信息,请参阅已发表的相关报告。

什么时候应测量种植体稳定性?

种植体稳定性可在治疗的不同阶段进行测量。
为确定基线,在种植体植入时通常会进行测量,然后在愈合过程中也会测量,以监测稳定性变化和骨整合情况。装填之前通常会进行最终测量,以帮助判断是否可以进行装填。
随着时间推移进行重复测量可提供有价值的信息,因为 ISQ 值的变化趋势有助于指导临床决策。

了解牙科骨整合

了解牙科骨整合

什么是已骨整合的种植体?

已骨整合的牙齿种植体是已经与周围骨骼稳固连接到种植体,其为假牙提供稳固基础并随着时间的推移确保牙齿的牢固。1 2

在牙科中,骨整合是怎样一个过程?

在骨整合过程中,骨细胞在种植体表面生长并稳固地与其连接,随着时间的推移,实现从机械稳定性到生物稳定性的过渡。1 3

在牙齿种植体中,骨整合的定义是什么?

骨整合是活骨与种植体表面之间直接的功能性连接。其是确保牙齿种植体稳固和成功种植的关键因素。1 2

什么时候应测量种植体稳定性?

种植体稳定性可在治疗的不同阶段进行测量。
为确定基线,在种植体植入时通常会进行测量,然后在愈合过程中也会测量,以监测稳定性变化和骨整合情况。装填之前通常会进行最终测量,以帮助判断是否可以进行装填。
随着时间推移进行重复测量可提供有价值的信息,因为 ISQ 值的变化趋势有助于指导临床决策。

Osstell Classic

关于 Osstell Classic 的问题

Osstell 器械的保修期是多少?

Osstell Beacon – 2 年
W&H Osstell Classic – 1 年

如何使用 Osstell Classic 进行测量?

对患者使用前,请在器械上安装一个隔离套。隔离套有助于防止交叉感染,并有助于防止牙科复合材料粘附在器械尖端和主体表面,同时避免清洁溶液导致的变色和降解。

注意

  • 隔离套仅供单个患者一次性使用。
  • 每位患者使用后,请将使用过的隔离套按标准废弃物处理。
  • 请勿将隔离套长时间留在器械上。
  • 推荐的隔离套如下:
    • TIDIShield,商品号:20808、20987。tidiproducts.com
    • PremiumPlus:183-2 X 光传感器隔离套,尺寸 2
  • 每位患者测量后,必须使用适当的清洁剂清洁器械。
  • 应在种植体植入时进行首次测量,以获得愈合过程中后续测量的基准值。最终修复前需再次测量,以观察种植体稳定性的变化。
  • 建议在颊舌向和近远中向两种方向进行测量以找到最低的稳定性。因此,仪器会提示用户在这两个方向进行测量。
  • 点击此处查看测量方法视频。
如何清洁器械?

每次使用前,使用推荐的(参阅下表)表面清洁剂用湿巾或软布擦拭整个器械。

可接受的清洁剂:

  • 浓度为 70% 的异丙醇溶液
  • 低泡中性活性酶清洁剂,如:
    • BePro 消毒湿巾,REF 19500102,www.wh.com(可通过 W&H Sterilization 订购)
    • Medizime LF
    • Enzol

请勿使用:

  • 酸性或酚类清洁剂/消毒剂
  • 任何类型的强碱性清洁剂,包括洗手液和洗洁精
  • 漂白清洁剂
  • 过氧化氢清洁剂
  • 磨蚀性清洁剂
  • 丙酮或烃类清洁剂
  • MEK(甲乙酮)
  • Birex
  • 戊二醛
  • 季铵氯化物盐基清洁剂

本器械无需进行定期维护。如果器械发生故障,请联系当地的销售代表或经销商获取更多说明。

如何在基牙上测量并记录 ISQ?

您可以在 OsstellConnect 中记录基牙水平的 ISQ 值,但必须遵循正确的临床测量流程,以获取准确的测量结果。

如何测量基牙水平的 ISQ 值

  1. 在安装基牙之前,先进行种植体水平测量。
  2. 在同一次治疗过程中,使用专用于基牙水平测量的 SmartPeg 再次进行基牙水平测量。
  3. 记录种植体水平 ISQ 值与基牙水平 ISQ 值之间的差值,以确定偏移值。该偏移值在整个愈合过程中保持稳定,后续解读随访测量结果时应使用该偏移值。
  4. 在之后的所有复诊中,在基牙处进行测量,并应用相同的偏移值,即可了解种植体真实的 ISQ 值。

如何在 OsstellConnect 中记录测量结果:

  1. 进入患者注册页面,在牙位图中选择患者和种植体。点击“添加基牙”,选择基牙并保存。
  2. 选择“测量稳定性”,并在“测量水平”下选择“基牙”。按照种植体水平测量的方法,在基牙处进行测量并保存。
  3. 如需查看稳定性趋势,请打开“稳定性”选项卡,并切换“显示基牙”。您还可以启用“显示详情”,查看颊舌向和近远中向 ISQ 值。

如需更详细的说明和临床指导,请参阅此处的博文。

How can I find the serial number (SN)?

You can find the serial number on the back of your instrument.

在测量时,为什么会获得意外值或无度数的现象?

可能的原因包括:


重复使用 SmartPeg: SmartPeg 为一次性器件,仅应在一次治疗过程中为单个患者进行一次或多次测量时使用。反复使用会因软铝螺纹磨损而导致读数不准确。

为种植体选择了错误的 SmartPeg 类型: 请参阅 SmartPeg 参考列表:osstell.com/smartpegguide

SmartPeg 与种植体之间存在骨或软组织: 连接 SmartPeg 前,请确保清洁种植体的修复连接部位。

电磁干扰: 排除电磁干扰源。

探头距离 SmartPeg 过远: 将探头保持在距离 SmartPeg 2–4 mm 处。

为什么需要在同一次测量过程中进行两次测量?

ISQ 始终应从两个方向进行测量,因为种植体稳定性可能会因不同方向的周围骨量不同而有所差异。从两个角度进行测量,可以确保获取稳定性最高和最低方向的数据。
为此,请分别在颊舌向和近远中向各进行一次测量。这两个 ISQ 值分别代表不同方向的稳定性。两个测量值有时相同,有时则不同。
如果两个测量值不同,务必以较低的 ISQ 值为准,因为该值反映了稳定性较弱的方向,因此能够提供与临床最相关的种植体稳定性信息。

是否有研究证明 Osstell 方法有效?

截至目前,已有数千篇发表的科学论文涉及 Osstell 器械的应用。在我们可以搜索的数据库“资源/科学数据库”中,可以找到这些论文摘要。

Osstell ISQ 量表基于这些研究结果建立,所有研究均使用 Osstell 器械和铝制 SmartPeg 完成。


科学数据库 – ISQ 种植体稳定性证据 – Osstell®

Osstell 技术的工作原理是什么?

Osstell 使用共振频率分析(RFA)技术测量种植体稳定性。安装在种植体上的小型 SmartPeg 顶部有一块微型磁铁。当探头发送磁脉冲时,SmartPeg 会始振动 – 类似于一块非常小的振动音叉。
工作原理:

  1. 器械发送磁脉冲
    这些磁脉冲会让 SmartPeg 在不接触的情况下产生振动。
  2. 振动会随种植体的稳定性而变化
    • 种植体越稳定(骨支撑良好),SmartPeg 的振动速度越快。
    • 种植体越不稳定,SmartPeg 的振动速度越慢。
  3. 器械会将该振动转换为 ISQ 值
    • 稳定性越高 → 频率越高 → ISQ 值越高
    • 稳定性越低 → 频率越低 → ISQ 值越低

测量耗时不到 1 秒,并会立即显示 ISQ 值。

如果未显示 ISQ 值该怎么办?

如果未显示 ISQ 值,通常表示器械未能清晰检测到 SmartPeg 振动。导致这种情况的因素有多种,大多数都容易解决:

  1. 器械距离过远
    器械通常应保持在距离 SmartPeg 顶部磁铁 2–4 mm 的位置。请勿触碰磁铁。如果未显示数值,请将器械靠近,直至检测到信号。
  2. 需要调整角度
    磁场有方向性,因此器械的方向会影响测量。测量时,器械应与 SmartPeg 顶部保持约 45°角。
  3. 确保为特定种植体选择正确类型的 SmartPeg
    请通过以下链接查找类型合适的 SmartPeg:查找我的 SmartPeg
  4. 软组织阻尼
    周围组织有时会比预期更明显地降低振动幅度。通常只需将器械稍微靠近即可补偿这一影响。
  5. 种植体平台不清洁
    请确保种植体平台清洁且无碎屑,以便 SmartPeg 正确就位并传递振动。
  6. SmartPeg 磨损或损坏
    • 如果您使用的是可重复使用型 SmartPeg,请确保在使用前完成检查,确认未超过 20 个重新处理循环。可重复使用型 SmartPeg 若是磨损、弯曲或螺纹损坏,将无法正常振动,器械可能无法读取测量值。
    • 一次性使用型 SmartPeg 仅适用于一次治疗过程。
    • 请确保 SmartPeg 已正确安装在种植体上,并且未与周围组织接触,因为这可能会阻碍准确检测信号,导致无法显示 ISQ 值或显示错误的 ISQ 值。
  7. 电磁干扰
    附近较强的电磁噪声源可能会干扰测量。(详情请参阅“电磁噪声”常见问题。)

使用 Osstell 器械是否会影响种植体?

不会。Osstell 测量不会影响种植体。该器械仅让 SmartPeg 产生振动。SmartPeg 中的磁铁由器械产生的极低能量磁脉冲激活。该技术具有客观、温和且高度可重复的特点。

能否为装有心脏起搏器的患者测量 ISQ?

可以。您可以对装有心脏起搏器的患者进行 ISQ 测量。
由于测量过程中会产生磁脉冲,可以将探头远离安装心脏起搏器的胸部区域,来作为预防措施。
有关心脏起搏器和磁场的更多参考信息,请参阅已发表的相关报告。

什么时候应测量种植体稳定性?

种植体稳定性可在治疗的不同阶段进行测量。
为确定基线,在种植体植入时通常会进行测量,然后在愈合过程中也会测量,以监测稳定性变化和骨整合情况。装填之前通常会进行最终测量,以帮助判断是否可以进行装填。
随着时间推移进行重复测量可提供有价值的信息,因为 ISQ 值的变化趋势有助于指导临床决策。

Questions about the Osstell IDx

Questions about the Osstell IDx

How can I update the software of my Osstell IDx?

Navigate to your clinic in your account. Select the instrument tab. Click on Download firmware.
Download instructions:

• Wait for the download to complete (could take a while depending on your connection)

• Copy the .m2f binary file to a USB memory stick

• Insert the memory stick in your IDx while it is running

• Follow instructions on the IDx display

Note: you cannot open or view the .m2f file
You can also check this guide

How can I find my registration code?

Osstell Beacon
• To find your registration code, please make sure that you have already installed the Beacon Gateway. If you have not installed it yet, please navigate to your clinic in your account, click the instruments tab and download the gateway. Install it.
• Take your instrument in hand. It is now connecting to OsstellConnect and you should see a symbol animating. Please note that it can take a few seconds.
• When connected, the symbol stops animating.
• The registration code is now displayed on the lower screen of your instrument.

Osstell IDx
• When turning on your Osstell IDx for the first time, you will be prompted to select language, time zone, date and time.
• After that, you will need to set up a 4-digit pin code and a backup password. The backup password is needed when restoring to a backup, so please note it down and save it in a safe place.
• Your registration code is now displayed on your Osstell IDx.

What is the warranty on IDx?

Two years.

Why do I need to set the date and time again?

The IDx continues to consume a small amount of power even when switched off. If the battery becomes fully depleted (0%), the stored date and time settings will be lost.
When this happens, you will be prompted to set the date and time again at start-up.

If your IDx is connected to the internet, the date and time will be set automatically.

Why do I sometimes get an electromagnetic noise warning when I approach the SmartPeg with the probe?

An electromagnetic noise warning indicates the presence of an external or internal magnetic disturbance that may affect the measurement.
This can occur due to nearby electronic equipment, or if the probe is held very close to the instrument itself.

How do I get started?

Register your IDx by following the instructions in the device or by following this link.

How long is the battery life of the Osstell IDx?

For normal use, the batteries last for at least one day but in most cases longer. It takes about 2 hours to charge the IDx from a fully discharged state.

How do I perform a measurement?

Choose a tooth position on the touch screen and start measuring.

How do I add patient information?

Perform measurements, press End patient, and then save as Add new patient.

How do I edit patient information?

Simply select the pen symbol in the patient list to edit.

How can I save patient data?

The patient data can be saved either in the instrument or in OsstellConnect.

How can I delete ISQ values (e.g. in case I have accidentally measured twice from the same direction)?

Values can only be removed before saving clicking on the trash bin symbol. After saving the data cannot be modified.

Is the IDx Portal both Windows and Mac compatible?

Yes, OsstellConnect is accessible via iPhone, iPad, Mac or PC.

Why is the instrument locked?

Have you registered your device? You can only use the Osstell IDx for a limited time without registration.

Which Osstell products can be autoclaved?

The following products may be autoclaved (over-pressurized steam up to 135 deg Celsius):

  • SmartPeg Mount
  • Reusable SmartPeg
  • Probe (IDx)

Please note that single-use SmartPegs are disposable and cannot be autoclaved!

Why do I need a backup code?

To enable automatic backup of your Osstell IDx, you will be asked to create a backup code made up of 8 characters. The purpose of the backup is to reset the unit if you for some reason remove patients by mistake or lose your instrument. The code is created during the registration process and you only have to enter it once. To make sure you can access your backup at a later date, it is VERY important that you write this code down and keep it in a safe place.

Backup can also be done via USB without a code.

Questions about Osstell and the ISQ scale

Questions about Osstell and the ISQ scale

What is an ISQ value?

ISQ (Implant Stability Quotient) is a numerical value from 1 to 99 that describes implant stability. It is calculated from the resonance frequency measured when the Osstell instrument sends a magnetic pulse to a SmartPeg attached to the implant, translating this into a clinically intuitive value.


What ISQ value should I have before loading?

There is no single ISQ value that determines when an implant can be loaded. The decision depends on the stability over time (the ISQ trend), as well as clinical judgement and patient-specific risk factors.
As a general guideline, higher ISQ values provide greater confidence, and values around 70 or above are often considered suitable for loading non-splinted implants. For splinted restorations, lower values may be acceptable.
For guidance on how to interpret ISQ values, see the Osstell ISQ Scale.

There is no single ISQ value that determines suitability for immediate loading. In addition to the ISQ value, the decision depends on primary stability, clinical judgement, and patient-specific risk factors.
As a general guide, higher ISQ values indicate greater stability, and values around 70 or above may support immediate loading in appropriate cases.
For guidance on interpreting ISQ values, see the Osstell ISQ Scale.

What does Osstell measure?

Osstell measures the lateral stability of the implant and thereby indirectly the degree of osseointegration. The results are presented as an ISQ, ranging from 1-99 ISQ, which correlates to micro mobility.

What is the difference between RFA and DCA (Periotest) measurements?

Periotest (DCA) measurements are designed for natural teeth, which are connected to the bone via the periodontal ligament. In contrast, dental implants are anchored directly to the bone without a periodontal ligament.
RFA measurements using Osstell instruments assess implant stability by measuring the stiffness of the bone–implant interface. They provide an objective and repeatable value on a more sensitive scale, supporting reliable assessment over time.

What is the difference between ISQ and BIC?

ISQ and BIC measure different aspects of implant integration.
BIC (bone-to-implant contact) describes the percentage of the implant surface in contact with bone at a microscopic level, while ISQ reflects implant stability by measuring the stiffness of the bone–implant interface.

As a result, high BIC does not always mean high stability, as bone quality and stiffness also play a key role.

For a more detailed explanation, see: How ISQ correlates to torque

What is the lowest ISQ value typically observed?

Clinically, the lowest ISQ values typically seen are around 40.

If the stability is below 30, the implant is generally considered to have very low stability or to be loose. It may also indicate that the SmartPeg is not correctly mounted on the implant.

Very low values (below 20) are rarely seen in clinical situations and are more commonly observed in laboratory models with artificially low stability.