FAQ

Support

자주 묻는 질문

제품, ISQ 척도 및 사용 방법, OsstellConnect, Osstell 기술 등에 대해 자세히 알아보십시오.
SmartPeg 관련 질문

Can the reusable SmartPeg be sterilised according to the Prion cycle?

Yes, it can be sterilised with a Prion cycle at 134 °C for 18 minutes.

SmartPeg를 임플란트에 어떻게 장착해야 합니까?

일회용 SmartPeg를 사용하든 재사용 SmartPeg를 사용하든, SmartPeg Mount를 사용하여 장착해야 하며, 약 4~6Ncm의 토크로 조여야 합니다. 이는 일반적으로 손가락으로 가볍게 조이는 정도를 의미합니다. 이렇게 하면 임플란트나 SmartPeg가 손상될 위험 없이 SmartPeg가 올바르게 안착되어 정확한 ISQ 값을 측정할 수 있습니다.

Can I mix single-use and reusable SmartPegs in the same treatment session?

Yes. You can mix single-use and reusable SmartPegs during the same treatment session. The only requirement is that you use the correct SmartPeg Type number for the specific implant or abutment you are measuring.

Whether the SmartPeg is single-use or reusable does not affect the measurement.

재사용 SmartPeg는 일회용 SmartPeg와 동일한 ISQ 값을 제공합니까?

예, 무결성과 성능이 유지되는 한 그렇습니다.

Osstell은 또한 ISQ 방법에 관한 1500편 이상의 발표 연구를 바탕으로 멸균 일회용 SmartPeg와 알루미늄 소재의 재사용 SmartPeg를 모두 제공하는 유일한 기업입니다.

Osstell의 고유한 ISQ 척도와 SmartPeg를 사용하면 변환 표나 보정 계수가 필요하지 않습니다. 일회용 SmartPeg를 사용하든 재사용 SmartPeg를 사용하든, 측정된 ISQ 값이 실제값입니다.

How are the different SmartPegs packed?

SmartPegs are supplied in different packaging formats depending on whether they are single-use or reusable:

Single-use SmartPegs

  • Delivered sterile.
  • Supplied in boxes of 5 pieces, in a single sterile barrier system with protective outer packaging.
  • Intended for one treatment session only and must not be reused.

Reusable SmartPegs

  • Delivered nonsterile in individual packaging.
  • Must be cleaned, disinfected and sterilized before the first clinical use and after every subsequent use. (See quickguide at osstell/ifu).

SmartPeg Mount

  • Delivered nonsterile with the instrument.
  • Can be purchased separately, in package of 5.
  • Must also be cleaned, disinfected and sterilized before use and between patients. (See quickguide at osstell/ifu).
Is there a visual difference between the single-use and reusable SmartPeg?

Yes. The reusable and single use SmartPegs are designed so they can be easily distinguished visually:

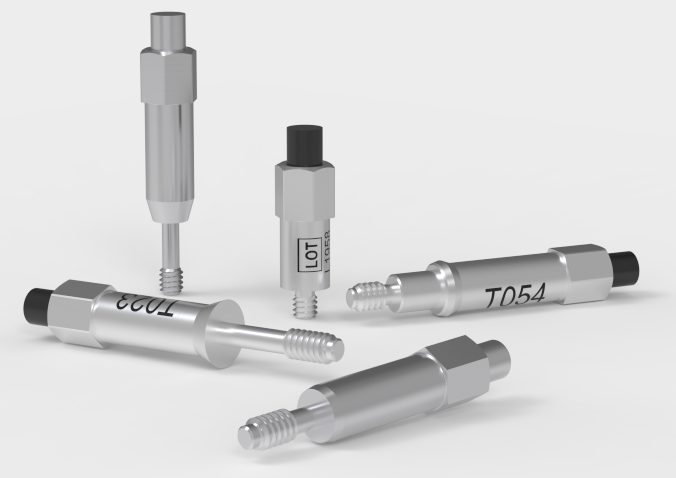
  • The single-use SmartPeg is supplied sterile, has an aluminium coloured (non coloured) magnet, and does not include any laser marked identifiers on the body.
  • The reusable SmartPeg has a black magnet on top and carries laser marked Type and LOT numbers on the body for identification and traceability.

SmartPeg는 몇 번 사용할 수 있습니까?

재사용 SmartPeg는 무결성과 성능이 유지되는 한 최대 20회의 재처리 사이클 동안 사용할 수 있습니다.
육안 검사상 마모, 변형, 부식, 나사산 손상, 기능적 호환성 저하가 확인되는 경우, 20회 미만으로 재처리되었더라도 SmartPeg를 폐기해야 합니다.

일회용 SmartPeg는 한 번의 치료 세션에만 사용하도록 제작되었으며 재처리해서는 안 됩니다.

Why can the reusable SmartPeg be cleaned and sterilised when the single-use SmartPeg cannot, even though both are made of aluminium?

The reusable SmartPeg is engineered with special protective surface coating – one on the SmartPeg body and another black protective coating on the magnet. These coatings provide resistance to moisture, cleaning chemicals, wear, and corrosion, ensuring that the SmartPeg maintains its performance throughout the validated number of reprocessing cycles.

The reusable SmartPeg can easily be distinguished from the single use version: it has a black magnet, and its LOT and Type number are laser marked on the body for clear identification.

재사용 SmartPeg와 SmartPeg Mount는 어떻게 세정하고 멸균해야 합니까?

첫 임상 사용 전, 그리고 각 사용 후 퀵가이드 지침에 따라 재사용 제품을 세정, 소독, 살균해야 하며, 지침은 다음에서 찾을 수 있습니다: Osstell/ifu

지대치에서 ISQ를 어떻게 측정하고 기록합니까?

OsstellConnect에서 지대치 수준의 ISQ를 기록할 수 있지만, 정확한 값을 얻으려면 올바른 임상 측정 절차를 따르는 것이 중요합니다.

지대치 수준에서 ISQ를 측정하는 방법

  1. 지대치 장착 전 먼저 임플란트 수준에서 측정합니다.
  2. 동일한 세션에서 지대치 수준 측정용 SmartPeg를 사용하여 지대치 수준에서 다시 측정합니다.
  3. 임플란트 수준과 지대치 수준의 ISQ 값 차이를 확인하여 오프셋을 산정합니다. 이 오프셋은 치유 기간 내내 일정하게 유지되며 추후 측정값을 해석할 때 사용해야 합니다.
  4. 모든 후속 방문 시, 지대치에서 측정한 후 동일한 오프셋을 적용하여 실제 임플란트 ISQ 값을 파악합니다.

OsstellConnect에서 측정값을 기록하는 방법:

  1. 환자 등록으로 이동하고, 치아 차트에서 환자와 임플란트를 선택합니다. ‘지대치 추가’를 클릭하고 지대치를 선택하고 저장합니다.
  2. ‘안정성 측정’을 선택한 후 측정 수준에서 ‘지대치’를 선택합니다. 임플란트 수준에서와 같은 방법으로 지대치에서 측정하고 저장합니다.
  3. 안정성 추세를 검토하려면 안정성 탭을 열고 ‘지대치 표시’로 전환합니다. 또한 ‘세부 정보 표시’를 활성화해 협측-설측 및 근심-원심 ISQ 값을 볼 수도 있습니다.

보다 자세한 설명과 임상 지침은 여기에서 블로그 게시물을 참고하시기 바랍니다.

동시에 두 가지를 측정하는 이유는 무엇입니까?

임플란트 안정성은 여러 방향의 주변 골량에 따라 달라질 수 있으므로, ISQ는 항상 두 방향에서 측정해야 합니다. 두 각도에서 측정하면 안정성이 가장 높은 방향과 가장 낮은 방향을 모두 확인할 수 있습니다.

이를 위해 협측-설측 방향에서 한 번, 근심-원심 방향에서 한 번 측정합니다. 이 두 ISQ 값은 서로 다른 방향의 안정성을 나타냅니다. 때로는 두 값이 동일하며, 때로는 두 값이 서로 다릅니다.

낮은 값은 가장 약한 방향을 반영하여 임플란트 안정성에 관해 임상적으로 가장 유의미한 정보를 제공하므로, 두 값이 다른 경우에는 항상 더 낮은 ISQ 값을 기준으로 해야 합니다.

Do I need a torque device to tighten the SmartPeg correctly?

No. A torque device should not be used to tighten the SmartPeg.

SmartPegs should always be mounted using the SmartPeg Mount and tightened to approximately 4–6 Ncm, which is typically described as finger tight.

This ensures the SmartPeg is seated correctly without risking damage to the implant connection.

Osstell 기술은 어떻게 동작합니까?

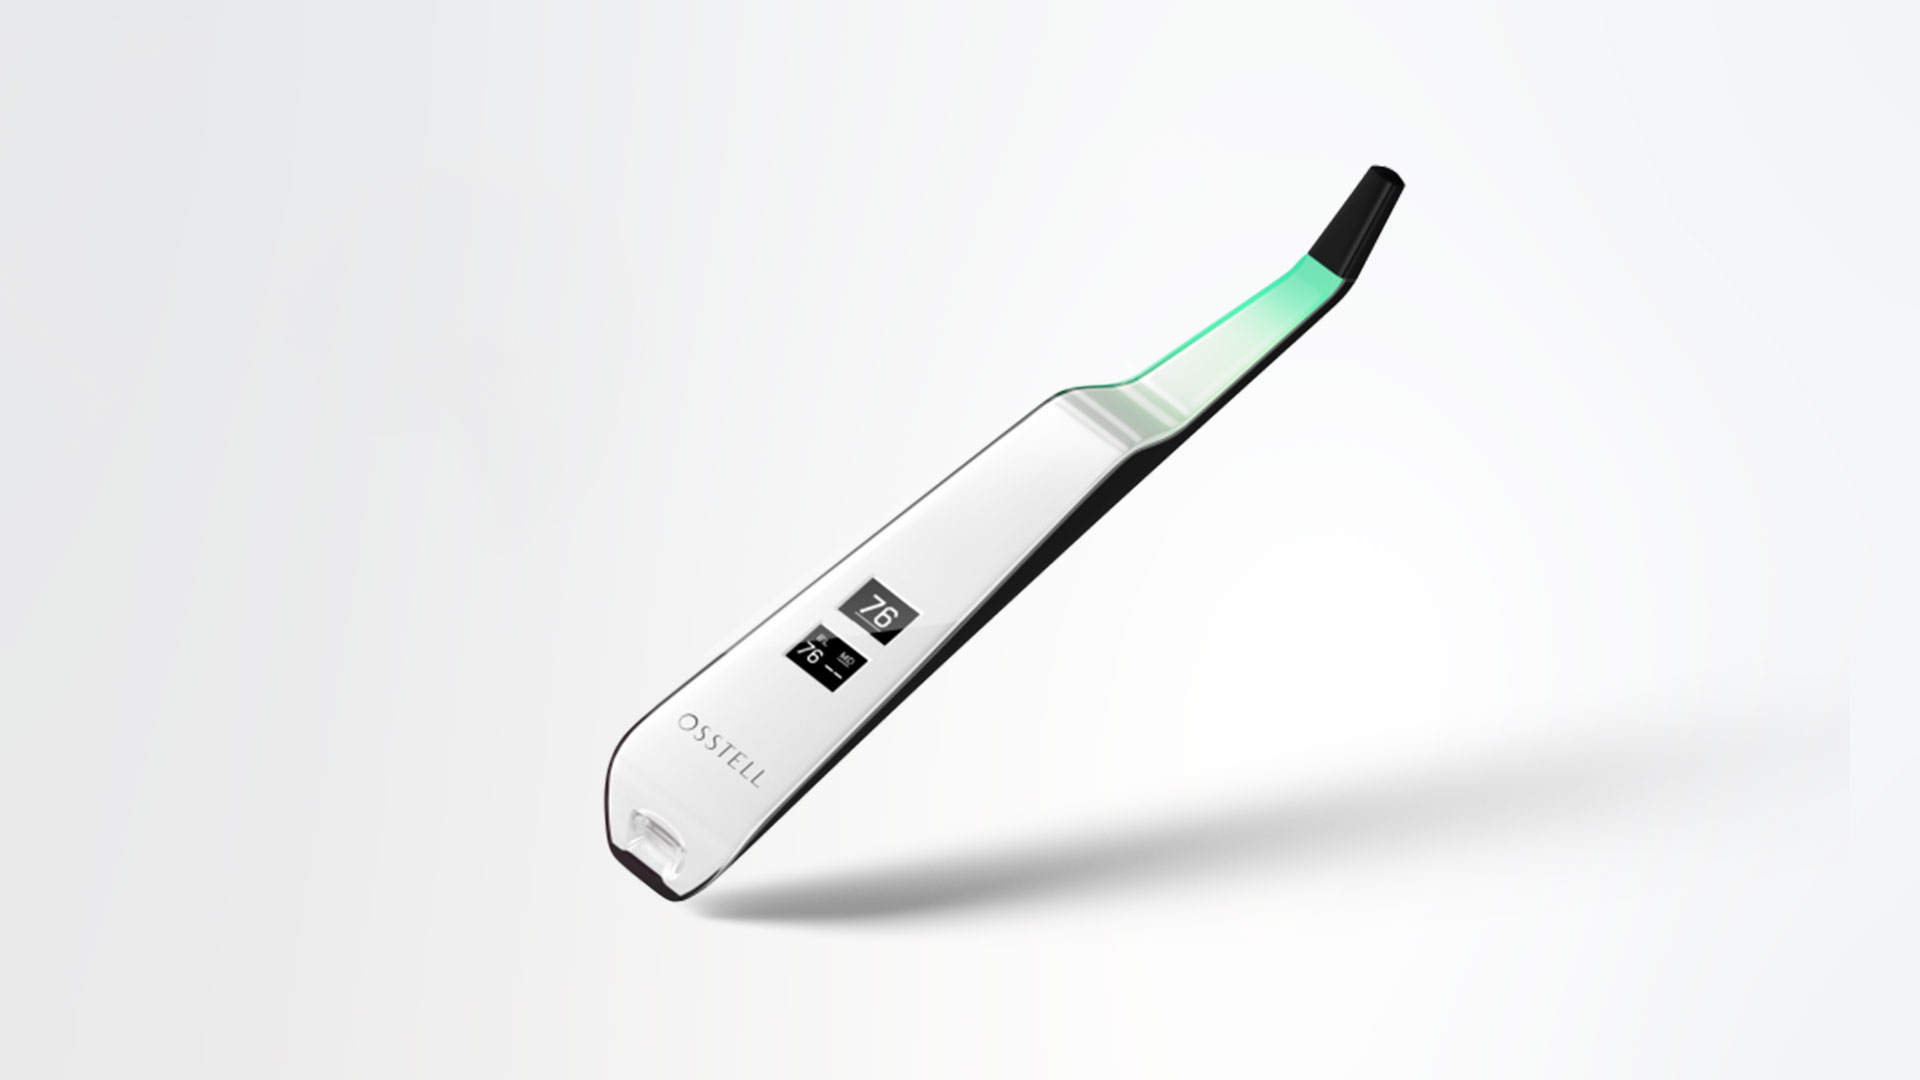
Osstell은 공명 주파수 분석(Resonance Frequency Analysis, RFA)을 사용하여 임플란트 안정성을 측정합니다. 임플란트에 부착하는 작은 SmartPeg의 상단에는 작은 자석이 있습니다. 프로브가 자기 펄스를 보내면 SmartPeg가 매우 작은 소리굽쇠와 같은 방식으로 진동하기 시작합니다.
동작 방법:

  1. 기구가 자기 펄스를 보냄
    이 자기 펄스는 SmartPeg에 직접 접촉하지 않고도 SmartPeg를 진동시킵니다.
  2. 임플란트 안정성에 따라 진동이 달라짐
    • 안정적인 임플란트(골 지지력이 우수함)는 SmartPeg를 더 빠르게 진동시킵니다.
    • 안전성이 낮은 임플란트는 SmartPeg를 더 느리게 진동시킵니다.
  3. 기구가 이 진동을 ISQ 값으로 변환함
    • 높은 안전성 → 높은 빈도 → 높은 ISQ
    • 낮은 안전성 → 낮은 빈도 → 낮은 ISQ

이는 1초도 걸리지 않으며, ISQ 값이 즉시 표시됩니다.

SmartPeg를 조이는 방식이 ISQ 값에 영향을 미칩니까?

예. SmartPeg가 올바르게 장착되지 않은 경우 ISQ 값에 영향을 미칠 수 있습니다.

정확한 측정을 위해서는 SmartPeg Mount를 사용하여 SmartPeg를 손으로 조인 정도로 장착해야 하며, 이는 약 4~6Ncm에 해당합니다.

이 정도로 조이면 SmartPeg가 임플란트에 견고하고 안정적으로 접촉하여 일반적으로 ±2 ISQ 단위 이내의 일관된 ISQ 값을 얻을 수 있습니다.

  • SmartPeg가 완전히 안착되지 않은 경우:
    접촉이 불안정해지면 ISQ 값이 실제보다 낮게 나타나거나 측정값이 표시되지 않을 수 있습니다.
  • 과도한 힘을 가한 경우:
    지나치게 조여도 정확도가 향상되지 않습니다. 이렇게 하면 SmartPeg 나사산을 손상시킬 수 있습니다.

    • 재사용 가능한 SmartPeg가 손상되어 다시 사용할 수 없게 될 수 있습니다.
    • 일회용 또는 재사용 가능한 SmartPeg의 나사산이 변형될 수 있으며, 이로 인해 해당 세션에서 부정확한 측정값이 나오거나 최악의 경우 SmartPeg가 파손될 수 있습니다.

요약: 손으로 조이는 정도(4~5Ncm)면 안정적인 접촉과 신뢰할 수 있는 ISQ 측정값을 확보할 수 있습니다.

Which Osstell products can be autoclaved?

The following products may be autoclaved (over-pressurized steam up to 135 deg Celsius):

  • SmartPeg Mount
  • Reusable SmartPeg
  • Probe (IDx)

Please note that single-use SmartPegs are disposable and cannot be autoclaved!

임플란트에 맞는 SmartPeg는 어떻게 선택합니까?

정확한 측정을 위해서는 임플란트별로 지정된 SmartPeg를 사용해야 합니다. SmartPeg는 각각의 임플란트 시스템 및 연결 유형에 적합합니다.

임플란트에 알맞은 SmartPeg는 SmartPeg 참조 가이드에서 확인할 수 있습니다. 여기를 클릭하여 확인하십시오.

OsstellConnect 관련 질문

지대치에서 ISQ를 어떻게 측정하고 기록합니까?

OsstellConnect에서 지대치 수준의 ISQ를 기록할 수 있지만, 정확한 값을 얻으려면 올바른 임상 측정 절차를 따르는 것이 중요합니다.

지대치 수준에서 ISQ를 측정하는 방법

  1. 지대치 장착 전 먼저 임플란트 수준에서 측정합니다.
  2. 동일한 세션에서 지대치 수준 측정용 SmartPeg를 사용하여 지대치 수준에서 다시 측정합니다.
  3. 임플란트 수준과 지대치 수준의 ISQ 값 차이를 확인하여 오프셋을 산정합니다. 이 오프셋은 치유 기간 내내 일정하게 유지되며 추후 측정값을 해석할 때 사용해야 합니다.
  4. 모든 후속 방문 시, 지대치에서 측정한 후 동일한 오프셋을 적용하여 실제 임플란트 ISQ 값을 파악합니다.

OsstellConnect에서 측정값을 기록하는 방법:

  1. 환자 등록으로 이동하고, 치아 차트에서 환자와 임플란트를 선택합니다. ‘지대치 추가’를 클릭하고 지대치를 선택하고 저장합니다.
  2. ‘안정성 측정’을 선택한 후 측정 수준에서 ‘지대치’를 선택합니다. 임플란트 수준에서와 같은 방법으로 지대치에서 측정하고 저장합니다.
  3. 안정성 추세를 검토하려면 안정성 탭을 열고 ‘지대치 표시’로 전환합니다. 또한 ‘세부 정보 표시’를 활성화해 협측-설측 및 근심-원심 ISQ 값을 볼 수도 있습니다.

보다 자세한 설명과 임상 지침은 여기에서 블로그 게시물을 참고하시기 바랍니다.

How should I document an implant failure?

• To document an implant failure, go to your patients records. Select the patient, then select the tooth. Click ‘Mark as failed’. Choose the type of failure (early or late failure), fill in the failure date. Choose the reason for failure. Click ‘Mark as failed’.

• You can access the history of the implant failure by navigating to the history tab. Click the tab ‘Failed’ to see all information related to the treatment and the failure.

• A history symbol is displayed on the tooth with a failed implant.

내 Osstell IDx에서 OsstellConnect로 데이터를 업로드하는 방법은 무엇입니까?

인터넷에 연결된 경우 Osstell IDx의 데이터는 OsstellConnect 계정에 자동으로 업로드됩니다. 기기를 인터넷에 연결하려면 다음 지침을 따르십시오.

예를 들어 USB 스틱에 백업을 만들 수도 있습니다. 다음 지침을 따르십시오.


https://osstell.com/app/uploads/How-to-connect-to-the-Internet-6.0.pdf

https://osstell.com/app/uploads/Backup-Osstell-IDx-6.0.pdf

내 Osstell Beacon을 어떻게 OsstellConnect에 연결하고 데이터를 직접 기록할 수 있습니까?

시작하기 전에 Beacon Gateway를 이미 설치했는지 확인하십시오. 아직 설치하지 않았다면 계정에서 클리닉을 탐색하고 기기 탭을 클릭하고 게이트웨이를 다운로드합니다. 게이트웨이를 설치합니다.

  • Osstell Key를 컴퓨터의 USB 포트에 꽂습니다.
  • 기구를 손에 듭니다. 이제 기기가 OsstellConnect에 연결 중이며 다음 기호가 애니메이션으로 나타날 것입니다. 몇 초 정도 걸릴 수 있습니다.
  • 연결되면 기호의 애니메이션 동작이 멈춥니다.
  • 환자 기록으로 이동합니다.
    • 처음 측정하는 경우에는 환자를 생성합니다. 환자 데이터를 입력하고 저장합니다. 새 치료를 클릭하고 치료 정보를 입력합니다. 임플란트 추가를 클릭하고 임플란트 데이터를 입력하고 저장합니다. 안정성 측정을 클릭합니다.
    • 후속 측정인 경우에는 환자를 선택한 다음 치아 차트에서 치아를 선택합니다. 안정성 측정을 클릭합니다.
  • 협측-설측 방향으로 측정합니다. ISQ 값이 이제 OsstellConnect에 표시됩니다.
  • 근심-원심 방향으로 측정합니다. ISQ 값이 이제 OsstellConnect에 표시됩니다.
  • 치료에 대한 정보를 입력하고 저장합니다.
Can I delete a measurement?

Yes, simply navigate to your patient records. Select the patient. Select the implant. Go to the stability tab. Click on the edit icon by the measurement you would like to delete. Click delete. Please note that the measurement will be permanently removed from the patient chart.

Can I delete a patient?

Yes, simply navigate to your patient records. Select the patient you would like to delete. Click delete in the upper right corner. Confirm that you want to delete the patient and all data. Please note that it will be permanently removed from your account.

내 데이터를 전부 내보낼 수 있습니까?

예, 추가 분석을 위해 모든 데이터를 Excel 파일로 내보낼 수 있습니다. 환자 기록으로 이동하여 CSV 내보내기를 클릭하기만 하면 됩니다. 다운로드에 파일이 나타납니다.

내보낸 모든 데이터는 GDPR 또는 HIPAA 등 관련 데이터 보호 규정을 준수하여 처리하십시오.

Can I manually edit implant data?

Yes, simply navigate to your patient records. Select the patient. Select the implant you want to edit on the tooth chart. Select the tab ‘Implant & abutment’. Click on the pen icon to edit. Edit implant data. Save.

How can I edit patient data?

Simply navigate to your patient records. Select the patient. Click ‘edit’ on the top right corner. Edit the data and save.

How can I find the serial number (SN)?

You can find the serial number on the back of your instrument.

How can I find my registration code?

Osstell Beacon
• To find your registration code, please make sure that you have already installed the Beacon Gateway. If you have not installed it yet, please navigate to your clinic in your account, click the instruments tab and download the gateway. Install it.
• Take your instrument in hand. It is now connecting to OsstellConnect and you should see a symbol animating. Please note that it can take a few seconds.
• When connected, the symbol stops animating.
• The registration code is now displayed on the lower screen of your instrument.

Osstell IDx
• When turning on your Osstell IDx for the first time, you will be prompted to select language, time zone, date and time.
• After that, you will need to set up a 4-digit pin code and a backup password. The backup password is needed when restoring to a backup, so please note it down and save it in a safe place.
• Your registration code is now displayed on your Osstell IDx.

Osstell Beacon 관련 질문

Osstell Beacon 관련 질문

Osstell 기구의 보증 기간은 얼마입니까?

Osstell Beacon – 2년
W&H Osstell Classic – 1년

기구를 어떻게 세척합니까?

사용하기 전에 항상 젖은 거즈나 부드러운 천에 권장 표면 세정제(아래 목록 참조)를 묻혀서 기구 전체를 닦습니다.

허용되는 세정제:

  • 이소프로필 알코올 70%
  • 다음과 같은 저발포성 중성pH 효소 세척제:
    • BePro Disinfectant Wipes, REF 19500102, www.wh.com (W&H Sterilization에서 주문 가능)
    • Medizime LF
    • Enzol

사용 금지:

  • 산성 또는 페놀 기반 세정제/소독제
  • 손 씻는 비누, 식기 세척제를 포함하여 모든 유형의 강 알칼리 세척제
  • 표백제 기반 세정제
  • 과산화수소 기반 세정제
  • 연마성 세정제
  • 아세톤 또는 탄화수소 기반 세척제
  • MEK(메틸에틸케톤)
  • Birex
  • 글루타르알데히드
  • 4차암모늄염화물염 기반 세정제

해당 기구는 정기 유지관리가 필요하지 않습니다. 기기 오작동 발생 시에는 현지 영업 담당자나 판매업체에 문의하여 추가적인 안내를 받으십시오.

지대치에서 ISQ를 어떻게 측정하고 기록합니까?

OsstellConnect에서 지대치 수준의 ISQ를 기록할 수 있지만, 정확한 값을 얻으려면 올바른 임상 측정 절차를 따르는 것이 중요합니다.

지대치 수준에서 ISQ를 측정하는 방법

  1. 지대치 장착 전 먼저 임플란트 수준에서 측정합니다.
  2. 동일한 세션에서 지대치 수준 측정용 SmartPeg를 사용하여 지대치 수준에서 다시 측정합니다.
  3. 임플란트 수준과 지대치 수준의 ISQ 값 차이를 확인하여 오프셋을 산정합니다. 이 오프셋은 치유 기간 내내 일정하게 유지되며 추후 측정값을 해석할 때 사용해야 합니다.
  4. 모든 후속 방문 시, 지대치에서 측정한 후 동일한 오프셋을 적용하여 실제 임플란트 ISQ 값을 파악합니다.

OsstellConnect에서 측정값을 기록하는 방법:

  1. 환자 등록으로 이동하고, 치아 차트에서 환자와 임플란트를 선택합니다. ‘지대치 추가’를 클릭하고 지대치를 선택하고 저장합니다.
  2. ‘안정성 측정’을 선택한 후 측정 수준에서 ‘지대치’를 선택합니다. 임플란트 수준에서와 같은 방법으로 지대치에서 측정하고 저장합니다.
  3. 안정성 추세를 검토하려면 안정성 탭을 열고 ‘지대치 표시’로 전환합니다. 또한 ‘세부 정보 표시’를 활성화해 협측-설측 및 근심-원심 ISQ 값을 볼 수도 있습니다.

보다 자세한 설명과 임상 지침은 여기에서 블로그 게시물을 참고하시기 바랍니다.

How can I find the serial number (SN)?

You can find the serial number on the back of your instrument.

How can I find my registration code?

Osstell Beacon
• To find your registration code, please make sure that you have already installed the Beacon Gateway. If you have not installed it yet, please navigate to your clinic in your account, click the instruments tab and download the gateway. Install it.
• Take your instrument in hand. It is now connecting to OsstellConnect and you should see a symbol animating. Please note that it can take a few seconds.
• When connected, the symbol stops animating.
• The registration code is now displayed on the lower screen of your instrument.

Osstell IDx
• When turning on your Osstell IDx for the first time, you will be prompted to select language, time zone, date and time.
• After that, you will need to set up a 4-digit pin code and a backup password. The backup password is needed when restoring to a backup, so please note it down and save it in a safe place.
• Your registration code is now displayed on your Osstell IDx.

시작하려면 어떻게 해야 하나요?

최적의 성능을 얻으려면 기구를 약 3시간 동안 충전하여 시작하십시오.

Osstell Beacon은 움직이면 자동으로 시작되며, 배터리 상태를 표시하고, BL(구강–설측) 방향으로 측정할 준비가 됩니다.

측정을 시작하려면 기구를 SmartPeg 또는 TestPeg 가까이 가져가십시오. 신호음이 울리면 측정이 완료된 것이며, ISQ 값과 함께 안정성 수준을 나타내는 색상 표시(빨간색, 노란색, 녹색)가 나타납니다.

기구를 등록하기 전까지는 시작 시 OsstellConnect 코드가 표시됩니다. 이곳에서 기구를 등록할 수 있습니다: OsstellConnect에 등록하기.

60초간 움직임이 없으면 기구가 자동적으로 꺼집니다.

How do I measure with the Osstell Beacon?

Video on how to measure: Measure with Osstell Beacon

1. Activate the Osstell Beacon by picking it up. The instrument will start-up and after showing the battery status, the instrument will be ready for measurement in the BL (Buccal – Lingual) direction, which is prompted in the upper display as well as optimal angle towards the Smartpeg.

2. Place a barrier sleeve over the Osstell beacon instrument.

3. Place the SmartPeg into the SmartPeg Mount. The SmartPeg is magnetic, and the SmartPeg Mount will hold the SmartPeg. See fig 2. Attach the SmartPeg to the implant or abutment by screwing the SmartPeg Mount using finger force of approximately 4-6 Ncm. Do not over-tighten, to avoid damaging the SmartPeg threads.

4. Hold the instrument tip close (2-4mm) to the top of the SmartPeg without touching it. Sometimes, you will need to go as close as 1 mm. An audible sound indicates when measurement has started, and measured data will be shown in the upper display combined with a colored light indication below the tip.

5. Bring the instrument out of the mouth to clearly read the ISQ value and the colored indication. The measured ISQ values will be displayed in the upper display for a couple of seconds and then switch to be ready for measurement in mesial-distal direction.

6. Repeat step 4 and the sequence starts over and the Osstell Beacon is ready for measurement in the BL (Buccal- Lingual) direction again.

7. When all measurements are performed, remove the SmartPeg by using the SmartPeg Mount. The instrument is automatically turned off after 60 seconds of inactivity.

측정했을 때 예상하지 못한 값이 나오거나 판독값을 읽을 수 없는 이유는 무엇입니까?

가능한 원인:


SmartPeg 재사용: SmartPeg은 일회용으로, 한 번의 치료 세션 동안 한 명의 환자에 대해 한 번 또는 여러 번의 측정에만 사용해야 합니다. 반복 재사용 시 연성 알루미늄 SmartPeg 나사산의 마모로 잘못된 판독값이 나올 수 있습니다.

임플란트에 맞지 않는 SmartPeg 유형 선택: SmartPeg 참조 목록(osstell.com/smartpegguide)을 확인하십시오.

SmartPeg와 임플란트 사이의 뼈 또는 연조직: SmartPeg 부착 전 임플란트 보철 연결부를 깨끗이 세정하십시오.

전자기 간섭: 전자기 간섭 원인을 제거하십시오.

프로브 거리 과다: 프로브를 SmartPeg에서 2–4 mm 떨어져 유지하십시오.

How do I get started?

Although it is possible to use the Osstell Beacon directly, depending on the status of the built-in rechargeable battery, it is recommended to charge the battery for at least 3 hours before using the Osstell Beacon instrument.

The Osstell Beacon is activated by a built-in motion sensor. As soon as the motion sensor detects movement, the Osstell Beacon will start-up and shortly show battery status and then be ready for measurement in the BL (Buccal – Lingual) direction, which is indicated in the upper display.

The Osstell Beacon will start to measure, indicated by an audible sound, when near an Osstell SmartPeg or Test peg due to a built-in magnetic detector that senses the magnet on the top of the Osstell SmartPeg/TestPeg. Measured data will be shown in the upper display combined with a colored light indication below the tip.

The red, yellow and green color indicates if the measured ISQ value corresponds to a low, medium or high implant stability according to the ISQ scale guidance, click here for more information.

After 60 seconds of no motion, the Osstell Beacon will turn off automatically.

How do I measure with the Osstell Beacon?

1. Activate the Osstell Beacon by picking it up. The instrument will start-up and after showing the battery status, the instrument will be ready for measurement in the BL (Buccal – Lingual) direction, which is prompted in the upper display as well as optimal angle towards the Smartpeg.

2. Place a barrier sleeve over the Osstell beacon instrument.

3. Place the SmartPeg into the SmartPeg Mount. The SmartPeg is magnetic, and the SmartPeg Mount will hold the SmartPeg. See fig 2. Attach the SmartPeg to the implant or abutment by screwing the SmartPeg Mount using finger force of approximately 4-6 Ncm. Do not over-tighten, to avoid damaging the SmartPeg threads.

4. Hold the instrument tip close (2-4mm) to the top of the SmartPeg without touching it. Sometimes, you will need to go as close as 1 mm. An audible sound indicates when measurement has started, and measured data will be shown in the upper display combined with a colored light indication below the tip.

5. Bring the instrument out of the mouth to clearly read the ISQ value and the colored indication. The measured ISQ values will be displayed in the upper display for a couple of seconds and then switch to be ready for measurement in mesial-distal direction.

6. Repeat step 4 and the sequence starts over and the Osstell Beacon is ready for measurement in the BL (Buccal- Lingual) direction again.

7. When all measurements are performed, remove the SmartPeg by using the SmartPeg Mount. The instrument is automatically turned off after 60 seconds of inactivity.

Why is it that I get unexpected values or no readings when measuring?

Possible explanations include:

Re-Used SmartPeg: The SmartPegs are disposable and should only be used for one or multiple measurement at one treatment session, for a single patient only. Repeated re-use may result in false readings due to wear and tear of the soft aluminum SmartPeg threads.

Wrong SmartPeg type selected for the implant: See SmartPeg reference list, osstell.com/smartpegguide

Bone or soft tissue in between SmartPeg and Implant: Make sure to clean the Implant prosthetic connection before attaching the SmartPeg.

Electromagnetic interference: Remove the source of electromagnetic interference.

Probe is held too far away from the SmartPeg: Hold the probe 2-4 mm away from the SmartPeg.

Do I need to be connected to WiFi?

You can have your Osstell Beacon online connected to OsstellConnect for data collection, but it is not a requirement. OsstellConnect is an online tool for statistical analysis and valuable insights based on your data. Before you can start using data connection to OsstellConnect you have to register your Osstell Beacon. The serial number can be found on the back of the instrument. For registration assistance and features of data connection to OsstellConnect, please visit osstellconnect.com/beacon

What is the warranty on the Osstell Beacon?

2 years

How do I clean the Osstell Beacon?

Before each use, moisten a gauze or soft cloth with an acceptable (see list below) surface disinfectant and wipe the whole Osstell Beacon instrument. Note! Do not autoclave the Osstell Beacon instrument. Routinely check the surface of the instrument tip and overall surface for possible cracks and resins.

Acceptable Cleaners:
o Isopropyl alcohol
o Ethyl alcohol-based cleaners

Do not use:
o Strong alkali detergent of any type, including hand soaps and dish soaps Bleach based cleaners
o Hydrogen Peroxide based cleaners Abrasive Cleansers
o Acetone or hydrocarbon based cleaners MEK (Methyl Ethyl Ketone)
o Birex Gluteraldehyde
o Quaternary Ammonium Chloride salt-based cleaners

How do I engage / disengage transportation mode?

The Osstell Beacon is delivered from factory in a “transport” mode, where the built-in motion sensor is deactivated. To deactivate the transport mode and start charging, connect the small USB connector of the Osstell USB cable to wide end of the instrument. Connect the large USB connector to a standard USB outlet of a PC, laptop or charger.

Osstell Beacon으로 측정하려면 어떻게 해야 합니까?

측정 방법 동영상: Osstell Beacon으로 측정

  1. Osstell Beacon을 집어 들어 활성화합니다. 기구가 시작되고 배터리 상태가 표시된 이후에 상단 디스플레이에 BL(구강–설측) 방향으로 측정할 준비가 되었다는 메시지와 SmartPeg를 향한 최적의 측정 각도가 표시됩니다.
  2. Osstell Beacon 기구 위에 차단 슬리브를 놓습니다.
  3. SmartPeg를 SmartPeg Mount에 놓습니다. SmartPeg에는 자성이 있어 SmartPeg Mount가 SmartPeg를 고정합니다. 그림 2 참조. 약 4~6Ncm으로 손가락으로 힘을 주어 SmartPeg Mount를 조여서 SmartPeg를 임플란트 또는 지대치에 부착합니다. SmartPeg 나사산이 손상되지 않도록 SmartPeg을 너무 조이지 마십시오.
  4. 기구 팁이 SmartPeg에 닿지 않도록 하면서 SmartPeg 상단과 가까이(2~4mm) 둡니다. 경우에 따라 1 mm까지 가까이 가져가야 할 수 있습니다. 측정이 시작되었음이 소리로 표시되고, 측정 데이터가 상단 디스플레이에 나타나는 동시에 팁 아래쪽에 색상 표시등이 나타날 것입니다.
  5. ISQ 값과 색상 표시를 명확하게 확인할 수 있도록 기구를 구강 밖으로 꺼냅니다. 상단 디스플레이에 측정된 ISQ 값이 몇 초 동안 표시된 후, 기구가 근심–원심 방향 측정 준비 상태로 전환됩니다.
  6. 4단계와 측정 순서가 반복되며, Osstell Beacon은 다시 BL(협측–설측) 방향으로 측정할 준비가 됩니다.
  7. 모든 측정을 수행한 경우, SmartPeg Mount를 사용하여 SmartPeg를 제거합니다. 60초간 비활성화되면 기구가 자동적으로 꺼집니다.
Do I need to be connected to Wi‑Fi?

No, a Wi‑Fi connection is not required to use your Osstell Beacon. You can measure implant stability and document ISQ values manually in your patient journal or in OsstellConnect at a later stage.
If connected, the Osstell Beacon can communicate wirelessly with OsstellConnect, allowing measurements to be transferred and recorded automatically.
OsstellConnect is an online tool used for data collection, statistical analysis and clinical insights based on your measurements.
To use the data connection, your Osstell Beacon must first be registered. The serial number can be found on the back of the instrument. For registration guidance and more information, please visit https://osstellconnect.com/register

How do I switch the Osstell Beacon from transport mode to use mode?

The Osstell Beacon is delivered in transportation mode with the motion sensor deactivated. To switch modes, briefly connect the USB cable to the instrument and a USB port on a computer for a few seconds, then disconnect.

What should I do if the Osstell Beacon doesn’t start or when the display is showing a wrench and a manual?

Charge the Beacon for at least 30 min in room temperature, then try again. If the error remains, try resetting the device by:

1. Identify the Beacon reset pin on the picture below.

2. With a paper clip, do a gentle press for 1 second on the reset button (Note! You may have to tilt the pin a little downwards).
If you see a “PadLock” symbol in the upper display, press one more time on the reset button.


If the Beacon still doesn’t start or the display is showing a wrench and a manual, then please contact your local sales representative or distributor or support@osstell.com.

동시에 두 가지를 측정하는 이유는 무엇입니까?

임플란트 안정성은 여러 방향의 주변 골량에 따라 달라질 수 있으므로, ISQ는 항상 두 방향에서 측정해야 합니다. 두 각도에서 측정하면 안정성이 가장 높은 방향과 가장 낮은 방향을 모두 확인할 수 있습니다.

이를 위해 협측-설측 방향에서 한 번, 근심-원심 방향에서 한 번 측정합니다. 이 두 ISQ 값은 서로 다른 방향의 안정성을 나타냅니다. 때로는 두 값이 동일하며, 때로는 두 값이 서로 다릅니다.

낮은 값은 가장 약한 방향을 반영하여 임플란트 안정성에 관해 임상적으로 가장 유의미한 정보를 제공하므로, 두 값이 다른 경우에는 항상 더 낮은 ISQ 값을 기준으로 해야 합니다.

Osstell 방법을 입증하는 연구가 있습니까?

현재 Osstell 기구를 연구에 사용한 수천 편의 논문이 과학 학술지에 게재되어 있습니다. ‘리소스/사이언스 데이터베이스’의 검색 가능 데이터베이스에서 이러한 초록을 확인할 수 있습니다.

Osstell ISQ 척도는 Osstell 기구와 알루미늄 SmartPeg를 사용하여 수행된 이러한 연구 결과를 토대로 합니다.


과학 데이터베이스 – ISQ 임플란트 안정성 근거자료 – Osstell®

Osstell 기술은 어떻게 동작합니까?

Osstell은 공명 주파수 분석(Resonance Frequency Analysis, RFA)을 사용하여 임플란트 안정성을 측정합니다. 임플란트에 부착하는 작은 SmartPeg의 상단에는 작은 자석이 있습니다. 프로브가 자기 펄스를 보내면 SmartPeg가 매우 작은 소리굽쇠와 같은 방식으로 진동하기 시작합니다.
동작 방법:

  1. 기구가 자기 펄스를 보냄
    이 자기 펄스는 SmartPeg에 직접 접촉하지 않고도 SmartPeg를 진동시킵니다.
  2. 임플란트 안정성에 따라 진동이 달라짐
    • 안정적인 임플란트(골 지지력이 우수함)는 SmartPeg를 더 빠르게 진동시킵니다.
    • 안전성이 낮은 임플란트는 SmartPeg를 더 느리게 진동시킵니다.
  3. 기구가 이 진동을 ISQ 값으로 변환함
    • 높은 안전성 → 높은 빈도 → 높은 ISQ
    • 낮은 안전성 → 낮은 빈도 → 낮은 ISQ

이는 1초도 걸리지 않으며, ISQ 값이 즉시 표시됩니다.

ISQ 값이 표시되지 않으면 어떻게 해야 합니까?

ISQ 값이 표시되지 않는 경우, 일반적으로 기구가 SmartPeg의 진동을 명확하게 감지하지 못하고 있음을 의미합니다. 여러 요인으로 인해 유발될 수 있지만 대부분 쉽게 해결할 수 있습니다.

  1. 기구와의 거리가 너무 멂
    일반적으로 기구는 SmartPeg 상단의 자석에서 2~4mm 떨어진 위치에 두어야 합니다. 자석을 건드리지 마십시오. 값이 표시되지 않으면 신호가 감지될 때까지 기구를 더 가까이 가져가십시오.
  2. 방향 조절 필요
    자기장은 방향성을 가지므로 기구의 방향이 중요합니다. SmartPeg 상단을 기준으로 약 45°의 각도에서 측정해야 합니다.
  3. 특정 임플란트를 위한 올바른 SmartPeg 유형인지 확인
    다음 링크에서 올바른 SmartPeg 유형을 찾을 수 있습니다: SmartPeg 찾기
  4. 연조직 감쇠
    때때로 주변 조직이 예상보다 크게 진동을 감쇠시킬 수 있습니다. 기구를 더 가까이 가져가면 대부분 이를 보완할 수 있습니다.
  5. 깨끗하지 않은 임플란트 플랫폼
    SmartPeg가 올바르게 안착되고 진동이 제대로 전달될 수 있도록 임플란트 플랫폼이 깨끗하고 이물질이 없는지 확인하십시오.
  6. 마모되거나 손상된 SmartPeg
    • 재사용 가능한 SmartPeg를 사용하는 경우, 사용 전에 점검을 완료했으며 재처리 횟수가 20회 이내인지 확인하십시오. 마모되거나 휘어졌거나 나사산이 손상된 재사용 SmartPeg는 올바르게 진동하지 않으며, 기구가 값을 읽지 못할 수 있습니다.
    • 일회용 SmartPeg는 한 번의 치료 세션에만 사용하도록 제작되었습니다.
    • 주변 조직과 접촉하면 신호가 정확하게 감지되지 않아 ISQ 값이 표시되지 않거나 부정확한 값이 표시될 수 있으므로, SmartPeg가 임플란트에 올바르게 안착되어 있고 주변 조직에 닿지 않는지 확인하십시오.
  7. 전자파 장해
    주변의 전자파 노이즈원이 측정을 방해할 수 있습니다. (자세한 내용은 “전자파 노이즈” FAQ를 참조하십시오.)
Osstell 기구 사용이 임플란트에 영향을 미칩니까?

아니요. Ostell 기구는 임플란트에 영향을 미치지 않습니다. 기구는 SmartPeg를 진동시킬 뿐입니다. SmartPeg의 자석은 기구에서 생성되는 매우 낮은 에너지의 자기 펄스에 의해 활성화됩니다. 이 기술은 객관적이고 영향이 적으며, 재현성이 매우 높습니다.

심박조율기를 사용하는 환자에게 ISQ를 측정해도 됩니까?

예, 심박조율기를 사용하는 환자에게 ISQ 측정을 수행해도 됩니다.
측정 중 자기 펄스가 방출되므로, 예방적 조치로 프로브를 심박조율기가 위치한 흉부 부위에서 멀리 떨어뜨려 사용해야 합니다.
추가 참고를 위해, 심박조율기와 자기장에 관한 발표 자료가 있습니다.

임플란트 안정성을 언제 측정해야 합니까?

임플란트 안정성은 치료의 여러 단계에서 측정할 수 있습니다.
일반적으로 임플란트를 식립할 때 기준값을 설정하기 위해 측정하고 이후 치유 과정에서 다시 측정하여 안정성과 골유착 변화를 모니터링합니다. 최종 측정은 부하를 가하기 전 임상적 판단을 뒷받침하기 위해 측정하는 경우가 많습니다.
ISQ 값의 변화 추이는 임상적 의사결정에 도움이 되므로, 시간 경과에 따른 반복 측정은 유용한 정보를 제공합니다.

Osstell Classic

Osstell Classic 관련 질문

Osstell 기구의 보증 기간은 얼마입니까?

Osstell Beacon – 2년
W&H Osstell Classic – 1년

Osstell Classic으로 어떻게 측정합니까?

환자에게 사용하기 전에 기구 위에 차단 슬리브를 놓습니다. 차단 슬리브는 교차 오염을 방지하고, 치과용 복합 재료가 기구 팁과 본체의 표면에 달라붙는 것을 방지하며, 세정액으로 인한 변색 및 열화를 방지하는 데 도움이 됩니다.

참고

  • 차단 슬리브는 환자 1인 전용입니다.
  • 각 환자에게 사용한 뒤 차단 슬리브는 표준 폐기물로 폐기하십시오.
  • 차단 슬리브를 장기간 동안 기구 위에 놓아두지 마십시오.
  • 권장 차단 슬리브는 아래를 참조하십시오.
    • TIDIShield, Art no: 20808, Art no: 20987. tidiproducts.com
    • PremiumPlus: 183-2 X-선 센서 슬리브, 크기 2
  • 각 환자 사용 후 반드시 적절한 제제로 기구를 세정해야 합니다.
  • 치유 과정 전반의 향후 측정을 위한 기준값을 얻기 위해 임플란트 식립 시 첫 번째 측정을 해야 합니다. 최종 보철 전 다시 측정하면 임플란트 안정성의 변화를 확인할 수 있습니다.
  • 가장 낮은 안정성을 찾기 위해 협설측(Buccal-Lingual)과 근원심(Mesial-Distal) 두 방향에서 측정하는 것이 권장됩니다. 따라서 기구는 두 방향 측정을 안내합니다.
  • 여기를 클릭하여 측정 방법 동영상을 확인하십시오.
기구를 어떻게 세척합니까?

사용하기 전에 항상 젖은 거즈나 부드러운 천에 권장 표면 세정제(아래 목록 참조)를 묻혀서 기구 전체를 닦습니다.

허용되는 세정제:

  • 이소프로필 알코올 70%
  • 다음과 같은 저발포성 중성pH 효소 세척제:
    • BePro Disinfectant Wipes, REF 19500102, www.wh.com (W&H Sterilization에서 주문 가능)
    • Medizime LF
    • Enzol

사용 금지:

  • 산성 또는 페놀 기반 세정제/소독제
  • 손 씻는 비누, 식기 세척제를 포함하여 모든 유형의 강 알칼리 세척제
  • 표백제 기반 세정제
  • 과산화수소 기반 세정제
  • 연마성 세정제
  • 아세톤 또는 탄화수소 기반 세척제
  • MEK(메틸에틸케톤)
  • Birex
  • 글루타르알데히드
  • 4차암모늄염화물염 기반 세정제

해당 기구는 정기 유지관리가 필요하지 않습니다. 기기 오작동 발생 시에는 현지 영업 담당자나 판매업체에 문의하여 추가적인 안내를 받으십시오.

지대치에서 ISQ를 어떻게 측정하고 기록합니까?

OsstellConnect에서 지대치 수준의 ISQ를 기록할 수 있지만, 정확한 값을 얻으려면 올바른 임상 측정 절차를 따르는 것이 중요합니다.

지대치 수준에서 ISQ를 측정하는 방법

  1. 지대치 장착 전 먼저 임플란트 수준에서 측정합니다.
  2. 동일한 세션에서 지대치 수준 측정용 SmartPeg를 사용하여 지대치 수준에서 다시 측정합니다.
  3. 임플란트 수준과 지대치 수준의 ISQ 값 차이를 확인하여 오프셋을 산정합니다. 이 오프셋은 치유 기간 내내 일정하게 유지되며 추후 측정값을 해석할 때 사용해야 합니다.
  4. 모든 후속 방문 시, 지대치에서 측정한 후 동일한 오프셋을 적용하여 실제 임플란트 ISQ 값을 파악합니다.

OsstellConnect에서 측정값을 기록하는 방법:

  1. 환자 등록으로 이동하고, 치아 차트에서 환자와 임플란트를 선택합니다. ‘지대치 추가’를 클릭하고 지대치를 선택하고 저장합니다.
  2. ‘안정성 측정’을 선택한 후 측정 수준에서 ‘지대치’를 선택합니다. 임플란트 수준에서와 같은 방법으로 지대치에서 측정하고 저장합니다.
  3. 안정성 추세를 검토하려면 안정성 탭을 열고 ‘지대치 표시’로 전환합니다. 또한 ‘세부 정보 표시’를 활성화해 협측-설측 및 근심-원심 ISQ 값을 볼 수도 있습니다.

보다 자세한 설명과 임상 지침은 여기에서 블로그 게시물을 참고하시기 바랍니다.

How can I find the serial number (SN)?

You can find the serial number on the back of your instrument.

측정했을 때 예상하지 못한 값이 나오거나 판독값을 읽을 수 없는 이유는 무엇입니까?

가능한 원인:


SmartPeg 재사용: SmartPeg은 일회용으로, 한 번의 치료 세션 동안 한 명의 환자에 대해 한 번 또는 여러 번의 측정에만 사용해야 합니다. 반복 재사용 시 연성 알루미늄 SmartPeg 나사산의 마모로 잘못된 판독값이 나올 수 있습니다.

임플란트에 맞지 않는 SmartPeg 유형 선택: SmartPeg 참조 목록(osstell.com/smartpegguide)을 확인하십시오.

SmartPeg와 임플란트 사이의 뼈 또는 연조직: SmartPeg 부착 전 임플란트 보철 연결부를 깨끗이 세정하십시오.

전자기 간섭: 전자기 간섭 원인을 제거하십시오.

프로브 거리 과다: 프로브를 SmartPeg에서 2–4 mm 떨어져 유지하십시오.

동시에 두 가지를 측정하는 이유는 무엇입니까?

임플란트 안정성은 여러 방향의 주변 골량에 따라 달라질 수 있으므로, ISQ는 항상 두 방향에서 측정해야 합니다. 두 각도에서 측정하면 안정성이 가장 높은 방향과 가장 낮은 방향을 모두 확인할 수 있습니다.

이를 위해 협측-설측 방향에서 한 번, 근심-원심 방향에서 한 번 측정합니다. 이 두 ISQ 값은 서로 다른 방향의 안정성을 나타냅니다. 때로는 두 값이 동일하며, 때로는 두 값이 서로 다릅니다.

낮은 값은 가장 약한 방향을 반영하여 임플란트 안정성에 관해 임상적으로 가장 유의미한 정보를 제공하므로, 두 값이 다른 경우에는 항상 더 낮은 ISQ 값을 기준으로 해야 합니다.

Osstell 방법을 입증하는 연구가 있습니까?

현재 Osstell 기구를 연구에 사용한 수천 편의 논문이 과학 학술지에 게재되어 있습니다. ‘리소스/사이언스 데이터베이스’의 검색 가능 데이터베이스에서 이러한 초록을 확인할 수 있습니다.

Osstell ISQ 척도는 Osstell 기구와 알루미늄 SmartPeg를 사용하여 수행된 이러한 연구 결과를 토대로 합니다.


과학 데이터베이스 – ISQ 임플란트 안정성 근거자료 – Osstell®

Osstell 기술은 어떻게 동작합니까?

Osstell은 공명 주파수 분석(Resonance Frequency Analysis, RFA)을 사용하여 임플란트 안정성을 측정합니다. 임플란트에 부착하는 작은 SmartPeg의 상단에는 작은 자석이 있습니다. 프로브가 자기 펄스를 보내면 SmartPeg가 매우 작은 소리굽쇠와 같은 방식으로 진동하기 시작합니다.
동작 방법:

  1. 기구가 자기 펄스를 보냄
    이 자기 펄스는 SmartPeg에 직접 접촉하지 않고도 SmartPeg를 진동시킵니다.
  2. 임플란트 안정성에 따라 진동이 달라짐
    • 안정적인 임플란트(골 지지력이 우수함)는 SmartPeg를 더 빠르게 진동시킵니다.
    • 안전성이 낮은 임플란트는 SmartPeg를 더 느리게 진동시킵니다.
  3. 기구가 이 진동을 ISQ 값으로 변환함
    • 높은 안전성 → 높은 빈도 → 높은 ISQ
    • 낮은 안전성 → 낮은 빈도 → 낮은 ISQ

이는 1초도 걸리지 않으며, ISQ 값이 즉시 표시됩니다.

ISQ 값이 표시되지 않으면 어떻게 해야 합니까?

ISQ 값이 표시되지 않는 경우, 일반적으로 기구가 SmartPeg의 진동을 명확하게 감지하지 못하고 있음을 의미합니다. 여러 요인으로 인해 유발될 수 있지만 대부분 쉽게 해결할 수 있습니다.

  1. 기구와의 거리가 너무 멂
    일반적으로 기구는 SmartPeg 상단의 자석에서 2~4mm 떨어진 위치에 두어야 합니다. 자석을 건드리지 마십시오. 값이 표시되지 않으면 신호가 감지될 때까지 기구를 더 가까이 가져가십시오.
  2. 방향 조절 필요
    자기장은 방향성을 가지므로 기구의 방향이 중요합니다. SmartPeg 상단을 기준으로 약 45°의 각도에서 측정해야 합니다.
  3. 특정 임플란트를 위한 올바른 SmartPeg 유형인지 확인
    다음 링크에서 올바른 SmartPeg 유형을 찾을 수 있습니다: SmartPeg 찾기
  4. 연조직 감쇠
    때때로 주변 조직이 예상보다 크게 진동을 감쇠시킬 수 있습니다. 기구를 더 가까이 가져가면 대부분 이를 보완할 수 있습니다.
  5. 깨끗하지 않은 임플란트 플랫폼
    SmartPeg가 올바르게 안착되고 진동이 제대로 전달될 수 있도록 임플란트 플랫폼이 깨끗하고 이물질이 없는지 확인하십시오.
  6. 마모되거나 손상된 SmartPeg
    • 재사용 가능한 SmartPeg를 사용하는 경우, 사용 전에 점검을 완료했으며 재처리 횟수가 20회 이내인지 확인하십시오. 마모되거나 휘어졌거나 나사산이 손상된 재사용 SmartPeg는 올바르게 진동하지 않으며, 기구가 값을 읽지 못할 수 있습니다.
    • 일회용 SmartPeg는 한 번의 치료 세션에만 사용하도록 제작되었습니다.
    • 주변 조직과 접촉하면 신호가 정확하게 감지되지 않아 ISQ 값이 표시되지 않거나 부정확한 값이 표시될 수 있으므로, SmartPeg가 임플란트에 올바르게 안착되어 있고 주변 조직에 닿지 않는지 확인하십시오.
  7. 전자파 장해
    주변의 전자파 노이즈원이 측정을 방해할 수 있습니다. (자세한 내용은 “전자파 노이즈” FAQ를 참조하십시오.)
Osstell 기구 사용이 임플란트에 영향을 미칩니까?

아니요. Ostell 기구는 임플란트에 영향을 미치지 않습니다. 기구는 SmartPeg를 진동시킬 뿐입니다. SmartPeg의 자석은 기구에서 생성되는 매우 낮은 에너지의 자기 펄스에 의해 활성화됩니다. 이 기술은 객관적이고 영향이 적으며, 재현성이 매우 높습니다.

심박조율기를 사용하는 환자에게 ISQ를 측정해도 됩니까?

예, 심박조율기를 사용하는 환자에게 ISQ 측정을 수행해도 됩니다.
측정 중 자기 펄스가 방출되므로, 예방적 조치로 프로브를 심박조율기가 위치한 흉부 부위에서 멀리 떨어뜨려 사용해야 합니다.
추가 참고를 위해, 심박조율기와 자기장에 관한 발표 자료가 있습니다.

임플란트 안정성을 언제 측정해야 합니까?

임플란트 안정성은 치료의 여러 단계에서 측정할 수 있습니다.
일반적으로 임플란트를 식립할 때 기준값을 설정하기 위해 측정하고 이후 치유 과정에서 다시 측정하여 안정성과 골유착 변화를 모니터링합니다. 최종 측정은 부하를 가하기 전 임상적 판단을 뒷받침하기 위해 측정하는 경우가 많습니다.
ISQ 값의 변화 추이는 임상적 의사결정에 도움이 되므로, 시간 경과에 따른 반복 측정은 유용한 정보를 제공합니다.

치의학 분야에서의 골유착에 대한 이해

치의학 분야에서의 골유착에 대한 이해

골유착 임플란트란 무엇입니까?

골유착 치과 임플란트는 주변 뼈와 결합되는 임플란트로, 보철 치아에 오랫동안 안전하게 유지되는 안정적인 토대를 제공합니다. 1 2

치의학에서 골유착은 어떻게 작용합니까?

골유착이 일어나는 동안, 주변에 뼈세포가 성장하여 임플란트 표면에 결합하며, 시간이 지남에 따라 기계적 안정성에서 생물학적 안정성으로 전환됩니다. 1 3

치과 임플란트에서 골유착의 정의는 무엇입니까?

골유착이란 살아 있는 뼈와 임플란트 표면 간에 직접적으로 이루어지는 기능적인 연결을 뜻합니다. 이는 치과 임플란트의 안정성과 성공을 보장하는 데 있어 매우 중요한 역할을 합니다. 1 2

임플란트 안정성을 언제 측정해야 합니까?

임플란트 안정성은 치료의 여러 단계에서 측정할 수 있습니다.
일반적으로 임플란트를 식립할 때 기준값을 설정하기 위해 측정하고 이후 치유 과정에서 다시 측정하여 안정성과 골유착 변화를 모니터링합니다. 최종 측정은 부하를 가하기 전 임상적 판단을 뒷받침하기 위해 측정하는 경우가 많습니다.
ISQ 값의 변화 추이는 임상적 의사결정에 도움이 되므로, 시간 경과에 따른 반복 측정은 유용한 정보를 제공합니다.

Questions about the Osstell IDx

Questions about the Osstell IDx

How can I update the software of my Osstell IDx?

Navigate to your clinic in your account. Select the instrument tab. Click on Download firmware.
Download instructions:

• Wait for the download to complete (could take a while depending on your connection)

• Copy the .m2f binary file to a USB memory stick

• Insert the memory stick in your IDx while it is running

• Follow instructions on the IDx display

Note: you cannot open or view the .m2f file
You can also check this guide

How can I find my registration code?

Osstell Beacon
• To find your registration code, please make sure that you have already installed the Beacon Gateway. If you have not installed it yet, please navigate to your clinic in your account, click the instruments tab and download the gateway. Install it.
• Take your instrument in hand. It is now connecting to OsstellConnect and you should see a symbol animating. Please note that it can take a few seconds.
• When connected, the symbol stops animating.
• The registration code is now displayed on the lower screen of your instrument.

Osstell IDx
• When turning on your Osstell IDx for the first time, you will be prompted to select language, time zone, date and time.
• After that, you will need to set up a 4-digit pin code and a backup password. The backup password is needed when restoring to a backup, so please note it down and save it in a safe place.
• Your registration code is now displayed on your Osstell IDx.

What is the warranty on IDx?

Two years.

Why do I need to set the date and time again?

The IDx continues to consume a small amount of power even when switched off. If the battery becomes fully depleted (0%), the stored date and time settings will be lost.
When this happens, you will be prompted to set the date and time again at start-up.

If your IDx is connected to the internet, the date and time will be set automatically.

Why do I sometimes get an electromagnetic noise warning when I approach the SmartPeg with the probe?

An electromagnetic noise warning indicates the presence of an external or internal magnetic disturbance that may affect the measurement.
This can occur due to nearby electronic equipment, or if the probe is held very close to the instrument itself.

How do I get started?

Register your IDx by following the instructions in the device or by following this link.

How long is the battery life of the Osstell IDx?

For normal use, the batteries last for at least one day but in most cases longer. It takes about 2 hours to charge the IDx from a fully discharged state.

How do I perform a measurement?

Choose a tooth position on the touch screen and start measuring.

How do I add patient information?

Perform measurements, press End patient, and then save as Add new patient.

How do I edit patient information?

Simply select the pen symbol in the patient list to edit.

How can I save patient data?

The patient data can be saved either in the instrument or in OsstellConnect.

How can I delete ISQ values (e.g. in case I have accidentally measured twice from the same direction)?

Values can only be removed before saving clicking on the trash bin symbol. After saving the data cannot be modified.

Is the IDx Portal both Windows and Mac compatible?

Yes, OsstellConnect is accessible via iPhone, iPad, Mac or PC.

Why is the instrument locked?

Have you registered your device? You can only use the Osstell IDx for a limited time without registration.

Which Osstell products can be autoclaved?

The following products may be autoclaved (over-pressurized steam up to 135 deg Celsius):

  • SmartPeg Mount
  • Reusable SmartPeg
  • Probe (IDx)

Please note that single-use SmartPegs are disposable and cannot be autoclaved!

Why do I need a backup code?

To enable automatic backup of your Osstell IDx, you will be asked to create a backup code made up of 8 characters. The purpose of the backup is to reset the unit if you for some reason remove patients by mistake or lose your instrument. The code is created during the registration process and you only have to enter it once. To make sure you can access your backup at a later date, it is VERY important that you write this code down and keep it in a safe place.

Backup can also be done via USB without a code.

Questions about Osstell and the ISQ scale

Questions about Osstell and the ISQ scale

What is an ISQ value?

ISQ (Implant Stability Quotient) is a numerical value from 1 to 99 that describes implant stability. It is calculated from the resonance frequency measured when the Osstell instrument sends a magnetic pulse to a SmartPeg attached to the implant, translating this into a clinically intuitive value.


What ISQ value should I have before loading?

There is no single ISQ value that determines when an implant can be loaded. The decision depends on the stability over time (the ISQ trend), as well as clinical judgement and patient-specific risk factors.
As a general guideline, higher ISQ values provide greater confidence, and values around 70 or above are often considered suitable for loading non-splinted implants. For splinted restorations, lower values may be acceptable.
For guidance on how to interpret ISQ values, see the Osstell ISQ Scale.

There is no single ISQ value that determines suitability for immediate loading. In addition to the ISQ value, the decision depends on primary stability, clinical judgement, and patient-specific risk factors.
As a general guide, higher ISQ values indicate greater stability, and values around 70 or above may support immediate loading in appropriate cases.
For guidance on interpreting ISQ values, see the Osstell ISQ Scale.

What does Osstell measure?

Osstell measures the lateral stability of the implant and thereby indirectly the degree of osseointegration. The results are presented as an ISQ, ranging from 1-99 ISQ, which correlates to micro mobility.

What is the difference between RFA and DCA (Periotest) measurements?

Periotest (DCA) measurements are designed for natural teeth, which are connected to the bone via the periodontal ligament. In contrast, dental implants are anchored directly to the bone without a periodontal ligament.
RFA measurements using Osstell instruments assess implant stability by measuring the stiffness of the bone–implant interface. They provide an objective and repeatable value on a more sensitive scale, supporting reliable assessment over time.

What is the difference between ISQ and BIC?

ISQ and BIC measure different aspects of implant integration.
BIC (bone-to-implant contact) describes the percentage of the implant surface in contact with bone at a microscopic level, while ISQ reflects implant stability by measuring the stiffness of the bone–implant interface.

As a result, high BIC does not always mean high stability, as bone quality and stiffness also play a key role.

For a more detailed explanation, see: How ISQ correlates to torque

What is the lowest ISQ value typically observed?

Clinically, the lowest ISQ values typically seen are around 40.

If the stability is below 30, the implant is generally considered to have very low stability or to be loose. It may also indicate that the SmartPeg is not correctly mounted on the implant.

Very low values (below 20) are rarely seen in clinical situations and are more commonly observed in laboratory models with artificially low stability.